Oreo Cookie Balls: A Sweet Journey of Discovery
Embark on a culinary adventure into the world of sweets with a recipe that’s as fun to make as it is to eat: Oreo Cookie Balls. This delightful treat is not just a recipe; it’s a passage into the art of cooking with your little ones, an exploration of textures, flavors, and the joy of creating something together. Let’s dive into this journey, where each step is an opportunity for learning, laughter, and creating memories that will last a lifetime.
Table of Contents
Gathering Your Culinary Treasure
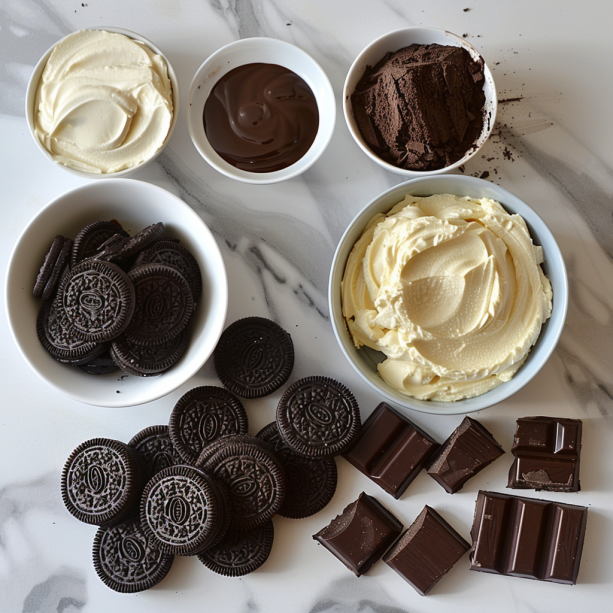
The adventure begins with assembling your ingredients, each one a precious component in our quest for deliciousness. Oreo cookies, cream cheese, and chocolate for melting—simple yet magical ingredients. Imagine each one as a key, unlocking doors to new culinary worlds. This is the perfect moment to engage your young chefs, letting them touch, smell, and even taste a little. Discuss the contrast between the crunchy cookies and the soft cream cheese, setting the stage for the transformation these ingredients will undergo.
The Quest Begins: Crushing Cookies
The first exciting task is crushing the Oreo cookies into fine crumbs, a perfect job for eager little hands. Place the cookies in a large ziplock bag and let the kids use a rolling pin to gently crush them. This step is not just about preparation; it’s a lesson in texture, cause and effect, and of course, a bit of fun! It’s a moment to teach that cooking involves all senses and actions, even the joyously messy ones.
The Magic of Mixing
Next, blend the crushed Oreos with cream cheese. This step transforms our separate ingredients into a rich, cohesive mixture, ready to be shaped into balls. It’s a wonderful opportunity to show children how different components come together to create something new and exciting. Let them mix with their hands (clean, of course!) to feel the change in texture, encouraging questions and exploration.
The Art of Shaping
Now, the real magic happens as you roll the mixture into balls. This is where imagination and creativity come into play. Guide your young chefs through rolling the perfect Oreo cookie ball, showing them that cooking is not just about following a recipe—it’s about creating with your own hands. Each ball, perfectly imperfect, is a testament to the fun and freedom of cooking.
A Chocolate Adventure
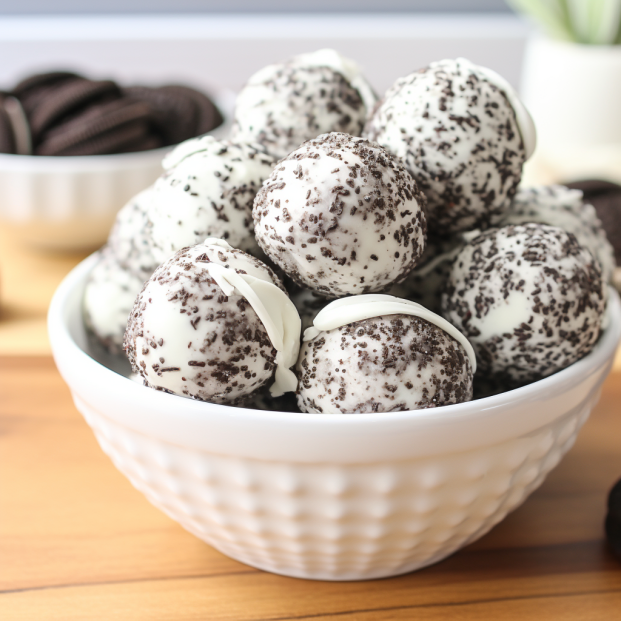
Melting chocolate is next on our journey. This step should be done by the adults, but it’s an excellent chance for a mini-science lesson about the melting point of chocolate and the importance of tempering. Once melted, kids can join back in, dipping the Oreo balls into the chocolate and watching as it transforms into a shiny coat, a protective armor for our delicious treasure.
The Final Touches
Decorating these little delights is where you can really let creativity shine. Sprinkles, edible glitter, or a drizzle of white chocolate—this is where each child can leave their mark on the recipe, making it truly their own. It’s a lesson in personal expression through food, a chance to see their ideas come to life.
Waiting for the Magic to Set
As the Oreo Cookie Balls chill in the refrigerator, it’s a good moment to teach patience—a crucial ingredient in both cooking and life. Use this time to clean up together, discussing what steps you took and what everyone enjoyed the most. It’s a reflective pause in our culinary adventure, appreciating the journey as much as the destination.
The First Taste
The unveiling of your Oreo Cookie Balls is a celebration, the culmination of your shared adventure. With each bite, relive the steps you took to get here, savoring not just the flavors but the memories made. Ask your young chefs what they thought of the process, what they learned, and what they’d like to try next. This isn’t just feedback; it’s the seeds of future culinary explorations.
Continuing the Journey
Every recipe is a chapter in the grand adventure of cooking. Today’s Oreo Cookie Balls are just the beginning. Engage with your little ones about what they’d like to explore next in the kitchen. The world of cooking is vast, filled with mysteries to unravel, skills to master, and joy to be found. Today, it was Oreo Cookie Balls, but tomorrow? The adventure continues.
In Conclusion
Creating Oreo Cookie Balls with your kids is more than just making a treat; it’s a journey through the heart of cooking, exploring, learning, and bonding. It’s about discovering the magic of turning simple ingredients into something extraordinary and the joy of doing it together. So, here’s to your next culinary adventure—may it be as sweet and fulfilling as the one you embarked on today.

Oreo Cookie Balls
Equipment
Equipment and Ingredient sections may contain affiliate links to items we use and love.
Ingredients
- 1 package, about 36 Oreo cookies
- 1 package, 8 oz. cream cheese, softened
- 12 oz. white or semi-sweet chocolate, melted
- Optional: Sprinkles, coconut shreds, or crushed nuts for topping
Instructions
- Crush the Oreos: Place the Oreo cookies in a food processor and pulse until you have fine crumbs. If you don’t have a food processor, put the cookies in a sealed plastic bag and crush them using a rolling pin. Transfer the crumbs to a mixing bowl.
- Mix with Cream Cheese: Add the softened cream cheese to the Oreo crumbs. Mix together until you have a smooth, unified mixture. This is a fun part for the kids; they can get their hands in there and help mix!
- Shape the Balls: Using a small scoop or your hands, shape the mixture into small balls, roughly the size of a walnut. Place them on a tray or plate lined with parchment paper.
- Melt the Chocolate: In a microwave-safe bowl, melt the chocolate in 30-second intervals, stirring after each interval until smooth. If you’re using a double boiler, melt the chocolate over simmering water.
- Dip in Chocolate: Dip each Oreo ball into the melted chocolate, ensuring it’s fully coated. Use a fork to lift them out, letting any excess chocolate drip off. Place them back on the parchment paper.
- Decorate: While the chocolate is still wet, kids can sprinkle their choice of toppings, whether it’s colorful sprinkles, coconut shreds, or crushed nuts.
- Chill: Once all Oreo balls are coated and decorated, place the tray in the refrigerator and let them chill for about an hour or until they’re set.
- Serve and Enjoy: Once set, serve and watch the smiles appear!
Notes
Nutrition
Kitchen Gear and Equipment We Use and Love
I just wanted to let you know that some of the links on this page are affiliate links. This means that if you click on these links and make a purchase, I may earn a small commission at no extra cost to you. Rest assured, I only recommend products and services that I personally use and love. Your support through these links helps me continue to create valuable content and keep this blog running. I appreciate your support!

Caperci Standard Natural Cupcake Liners 500 Count, No Smell, Food Grade & Grease-Proof Baking Cups Paper
$6.99 (as of June 29, 2024 19:36 GMT -04:00 - More infoProduct prices and availability are accurate as of the date/time indicated and are subject to change. Any price and availability information displayed on [relevant Amazon Site(s), as applicable] at the time of purchase will apply to the purchase of this product.)
Gevi Household V2.0 Countertop Gemi Nugget Ice Maker | Self-Cleaning Pellet Ice Machine | Open and Pour Water Refill | Stainless Steel Housing | Fit Under Wall Cabinet | Black
$499.99 (as of June 29, 2024 19:37 GMT -04:00 - More infoProduct prices and availability are accurate as of the date/time indicated and are subject to change. Any price and availability information displayed on [relevant Amazon Site(s), as applicable] at the time of purchase will apply to the purchase of this product.)
HexClad Hybrid Nonstick Pizza Steel for Pizzas and Flatbreads Up to 14", Oven- and BBQ Grill-Safe Up to 900°F
$149.00 (as of June 29, 2024 19:36 GMT -04:00 - More infoProduct prices and availability are accurate as of the date/time indicated and are subject to change. Any price and availability information displayed on [relevant Amazon Site(s), as applicable] at the time of purchase will apply to the purchase of this product.)
BANGSON Small Refrigerator with Freezer, 4.0 Cu.Ft, Small Fridge with Freezer, 2 Door, with Bottom Freezer, Compact Refrigerator for Apartment Bedroom Dorm and Office, Black
$293.99 (as of June 29, 2024 19:37 GMT -04:00 - More infoProduct prices and availability are accurate as of the date/time indicated and are subject to change. Any price and availability information displayed on [relevant Amazon Site(s), as applicable] at the time of purchase will apply to the purchase of this product.)