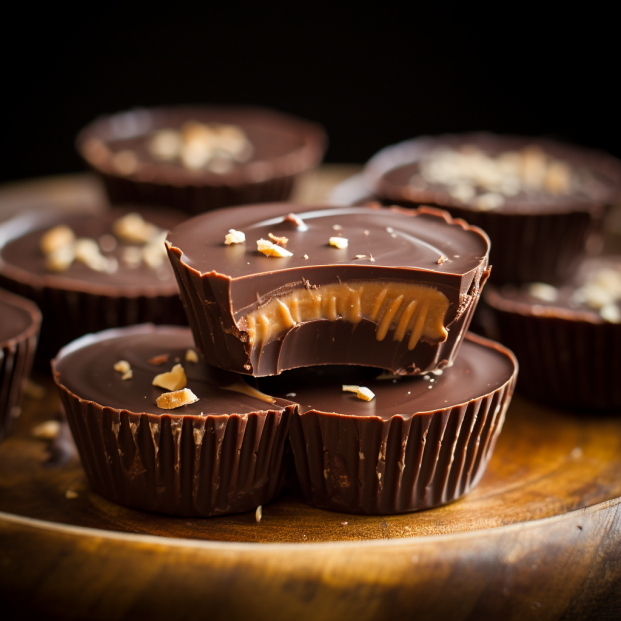
Chocolate Peanut Butter Cups: A Creamy Chocolatey Delight!
Summary
Who can resist the allure of chocolate peanut butter cups, especially when they’re this easy and fun to make? Dive into this no-cook, kid-friendly version that packs a punch of creaminess from the peanut butter and the lusciousness of melted chocolate. It’s a bonding activity and a treat, all rolled into one!
Table of Contents
Why You’ll Love This Recipe
- No-Cook & Kid-Friendly: Perfect for getting little ones involved.
- Quick & Easy: Takes just 15 minutes of prep time.
- Customizable: Mix and match different chocolates or nut butters.
- Budget-Friendly: Estimated cost is around $10 for 12 peanut butter cups.
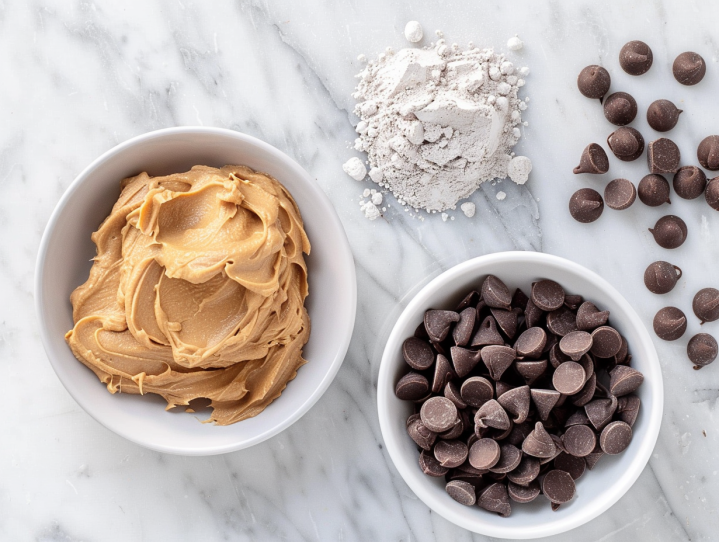
Ingredients Needed
- 1 cup creamy peanut butter (choose a natural, no-sugar-added variant for a healthier option)
- 1/2 cup powdered sugar
- 1 tsp vanilla extract
- 2 cups milk or dark chocolate chips
- 1 tbsp coconut oil or unsalted butter
- A pinch of salt
- Mini cupcake liners or silicone molds
Equipment Needed
- Microwave-safe bowl or double boiler
- Spoon or spatula
- Mini cupcake tray or silicone molds
- Small ice cream scoop or teaspoon
How to Make Chocolate Peanut Butter Cups
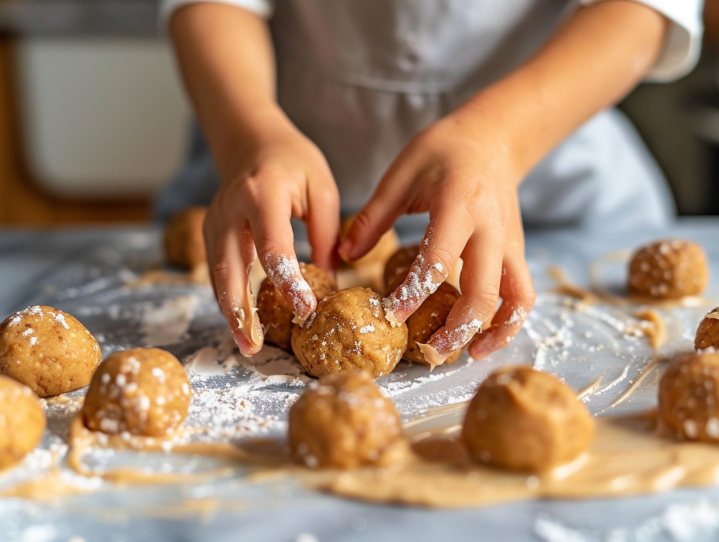
Step 1: Make the Peanut Butter Filling
- Mix Ingredients: In a mixing bowl, combine peanut butter, powdered sugar, vanilla extract, and a pinch of salt. Mix until you have a smooth, dough-like consistency.
Step 2: Melt the Chocolate
- Microwave Method: In a separate microwave-safe bowl, combine chocolate chips and coconut oil or butter. Microwave in 20-second intervals, stirring after each, until the chocolate is smooth and completely melted.
- Double Boiler Method: If using a double boiler, melt the chocolate on low heat, stirring constantly.
Step 3: Assemble the Peanut Butter Cups
- Prepare Molds: Place mini cupcake liners in the tray or use silicone molds.
- Base Layer: Pour a small amount of melted chocolate into the base of each liner or mold, just enough to cover the bottom.
- Add Peanut Butter Filling: Scoop a teaspoon of the peanut butter mixture and roll it into a small ball. Place it on top of the melted chocolate in the mold.
- Top Layer: Cover the peanut butter ball with more melted chocolate until it’s fully encased.
- Repeat Process: Repeat the process for each peanut butter cup.
Step 4: Chill & Enjoy
- Chill: Chill in the refrigerator for at least 1 hour or until the chocolate has set.
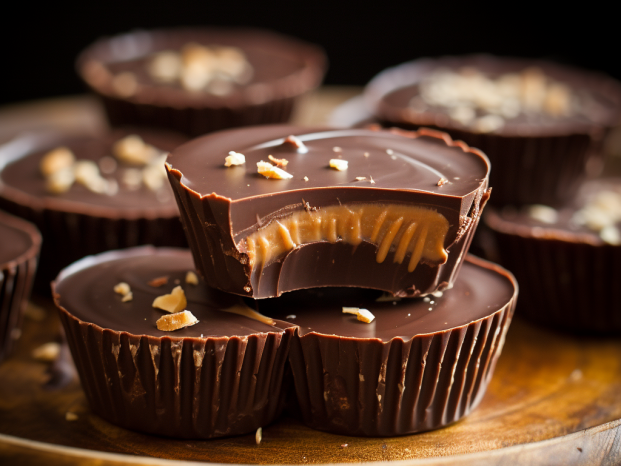
- Serve: Once set, pop them out of the molds and enjoy your homemade peanut butter cups!
How Kids Can Help
Involving kids in the kitchen makes this recipe extra special:
- Scooping & Rolling: Let them scoop and roll the peanut butter filling into balls.
- Layering: They can pour the chocolate base layer and cover the filling.
- Molding: Allow them to carefully place the peanut butter balls into the molds.
A Personal Story From a Reader: Making Chocolate Peanut Butter Cups with My Kids
One rainy afternoon last week, I found myself searching for an activity to keep my little ones entertained. As soon as I suggested making homemade Chocolate Peanut Butter Cups, their faces lit up with excitement. I had never seen them move so quickly to grab their aprons!
The Peanut Butter Team
Once we gathered all the ingredients on the counter, my helpers, Lily and Max, got into position.
Ingredients:
- 1 cup creamy peanut butter
- 1/2 cup powdered sugar
- 1 tsp vanilla extract
- 2 cups milk chocolate chips
- 1 tbsp coconut oil
- A pinch of salt
- Mini cupcake liners
Equipment:
- Microwave-safe bowl
- Spoon
- Mini cupcake tray
I handed Lily a mixing bowl and asked her to measure out the peanut butter.
“How many cups do we need?” she asked.
“One cup,” I replied, showing her the measuring cup. She carefully scooped out the creamy peanut butter, and with Max’s help, added powdered sugar, vanilla extract, and a pinch of salt.
“Let’s mix it up!” I cheered.
Lily and Max took turns stirring the mixture until it turned into a smooth, dough-like consistency.
Melting the Chocolate
Next came the chocolate. I placed chocolate chips and coconut oil in a microwave-safe bowl and handed it to Max.
“Can I push the buttons, Mom?” he asked eagerly.
“Of course! Put it in for 20 seconds,” I instructed.
We melted the chocolate in 20-second intervals, stirring after each round until it became smooth and glossy.
“It looks so yummy!” Max exclaimed, dipping his finger into the chocolate.
Building the Peanut Butter Cups
With everything ready, we lined a mini cupcake tray with paper liners and started assembling the cups.
“Okay, Lily, pour a little bit of chocolate in each cup to cover the bottom,” I said.
She did a great job, pouring just the right amount into each liner.
“Now it’s my turn!” Max shouted.
I gave him a teaspoon and showed him how to scoop and roll the peanut butter mixture into small balls. He placed one ball in each liner, and Lily poured more melted chocolate on top, covering the peanut butter completely.
“Perfect!” I praised them. “Now let’s chill them in the fridge.”
The Grand Reveal
After what felt like hours (but was really just an hour), we took the tray out of the fridge. The chocolate had set perfectly, and the kids couldn’t wait to pop the cups out of the liners.
“Wow! They look just like the ones from the store!” Lily marveled.
We each took a peanut butter cup and bit into it. The creamy peanut butter filling, encased in rich chocolate, was an instant hit.
“Mmm… these are even better!” Max declared with a chocolate-covered grin.
Final Thoughts
Making Chocolate Peanut Butter Cups with Lily and Max was not just about creating a sweet treat—it was about sharing laughs, teaching new skills, and creating memories that will last a lifetime. The joy in their faces as they dipped, rolled, and assembled each cup was priceless. Here’s to more sweet adventures in the kitchen and many more chocolatey smiles!
How to Store Leftovers
- Refrigerator: Store in an airtight container in the fridge for up to 2 weeks.
- Freezer: Freeze for up to 3 months. Thaw in the refrigerator before serving.
Substitutions and Additions
Substitutions
- Nut Butter Alternatives:
- Almond or Cashew Butter: Substitute peanut butter with almond or cashew butter.
- Sunflower Seed Butter: Use sunflower seed butter for a nut-free version.
- Chocolate Variations:
- White Chocolate: Swap in white chocolate chips for a different flavor.
- Dark Chocolate: Use dark chocolate chips for a richer taste.
Additions
- Flavor Enhancements:
- Sea Salt Flakes: Sprinkle on top for a salty-sweet combo.
- Cinnamon or Nutmeg: Add a pinch to the filling for extra warmth.
- Mix-Ins:
- Crispy Rice Cereal: Stir into the peanut butter mixture for crunch.
- Crushed Pretzels: Add to the chocolate base for a sweet-salty twist.
Frequently Asked Questions (FAQ)
Q: Can I use a different nut butter instead of peanut butter?
A: Yes! Almond butter, cashew butter, or sunflower seed butter all work well.
Q: How long do these peanut butter cups last?
A: They can last up to 2 weeks in the fridge and 3 months in the freezer.
Q: Can I use chocolate bars instead of chocolate chips?
A: Absolutely! Just chop the chocolate bars into smaller pieces before melting.
Q: How do I prevent the chocolate from seizing while melting?
A: Make sure no water comes in contact with the chocolate, and melt it slowly on low heat.
Q: Are these cups gluten-free?
A: Yes, as long as all your ingredients, especially the chocolate and powdered sugar, are gluten-free.
Reasons Why You Will Love This Recipe
- Creamy & Chocolatey: Perfect balance of sweet, salty, and nutty flavors.
- Easy to Make: A simple no-cook recipe that’s ready in no time.
- Fun for Kids: An interactive and enjoyable activity for the whole family.
- Customizable Treat: Easily switch up the flavors to your liking.
Final Thoughts
Making Chocolate Peanut Butter Cups is a delightful and rewarding activity that brings families together in the kitchen. From scooping and rolling to layering and chilling, this no-cook recipe creates not only delicious treats but also beautiful memories. Here’s to happy snacking and making sweet moments with every bite!
No-Cook Kiddo’s Peanut Butter Cups
Equipment
Equipment and Ingredient sections may contain affiliate links to items we use and love.
Ingredients
- 1 cup This section may contain affiliate links to products we know and love.Creamy Peanut Butter, choose a natural, no-sugar-added variant for a healthier option
- 1/2 cup This section may contain affiliate links to products we know and love.Powdered Sugar
- 1 tsp This section may contain affiliate links to products we know and love.Vanilla Extract
- 2 cups This section may contain affiliate links to products we know and love.Milk or Dark Chocolate Chips
- 1 tbsp This section may contain affiliate links to products we know and love.Coconut Oil
- This section may contain affiliate links to products we know and love.Salt
- This section may contain affiliate links to products we know and love.Mini Cupcake Liners
Instructions
- In a mixing bowl, combine peanut butter, powdered sugar, vanilla extract, and a pinch of salt. Mix until you have a smooth, dough-like consistency.
- In a separate microwave-safe bowl, combine chocolate chips and coconut oil or butter. Microwave in 20-second intervals, stirring after each, until the chocolate is smooth and completely melted. (If using a double boiler, melt the chocolate on low heat, stirring constantly.)
- Place mini cupcake liners in the tray or use silicone molds.
- Pour a small amount of melted chocolate into the base of each liner or mold, just enough to cover the bottom.
- Scoop a teaspoon of the peanut butter mixture and roll it into a small ball. Place it on top of the melted chocolate in the mold.
- Cover the peanut butter ball with more melted chocolate until it’s fully encased.
- Repeat the process for each peanut butter cup.
- Chill in the refrigerator for at least 1 hour or until the chocolate has set.
- Once set, pop them out of the molds and enjoy your homemade peanut butter cups!
Notes
Nutrition
Kitchen Gear and Equipment We Use and Love
I just wanted to let you know that some of the links on this page are affiliate links. This means that if you click on these links and make a purchase, I may earn a small commission at no extra cost to you. Rest assured, I only recommend products and services that I personally use and love. Your support through these links helps me continue to create valuable content and keep this blog running. I appreciate your support!

Upstreman 3.2 Cu.Ft Mini Fridge with Freezer, Single Door Mini Fridge, Adjustable Thermostat, Mini Refrigerator for Bedroom, Office, Dorm, Black-BR321
$179.99 (as of June 29, 2024 19:37 GMT -04:00 - More infoProduct prices and availability are accurate as of the date/time indicated and are subject to change. Any price and availability information displayed on [relevant Amazon Site(s), as applicable] at the time of purchase will apply to the purchase of this product.)
Wildone Mixing Bowls with Lids Set, 5PCS Stainless Steel Nesting Bowls with 3 Grater Attachments, Measurement Marks & Non-Slip Bottoms, Size 5, 3, 2, 1.5, 0.63 QT, Great for Mixing & Serving
$42.99 (as of June 28, 2024 19:26 GMT -04:00 - More infoProduct prices and availability are accurate as of the date/time indicated and are subject to change. Any price and availability information displayed on [relevant Amazon Site(s), as applicable] at the time of purchase will apply to the purchase of this product.)
Ice Cube Trays 4 Pack, Airabc Silicone with Removable Lid, Easy-Release Flexible 14-cube Trays, LFGB Certified and BPA Free, Stackable Covers for Cocktail, Freezer
$9.99 (as of June 29, 2024 19:37 GMT -04:00 - More infoProduct prices and availability are accurate as of the date/time indicated and are subject to change. Any price and availability information displayed on [relevant Amazon Site(s), as applicable] at the time of purchase will apply to the purchase of this product.)
Ice Makers Countertop, Portable Ice Maker Countertop 9 Ice Ready in 6 Mins, 26Lbs/24H, Self-Cleaning, Ice Machine with Ice Scoop & Basket (Black)
$59.99 (as of June 29, 2024 19:37 GMT -04:00 - More infoProduct prices and availability are accurate as of the date/time indicated and are subject to change. Any price and availability information displayed on [relevant Amazon Site(s), as applicable] at the time of purchase will apply to the purchase of this product.)