Journey to Japan: Crafting Mini Rice Balls Together
Hello, adventurous families and little chefs! Today, we’re embarking on a culinary journey all the way to Japan from the comfort of our own kitchens. We’re going to dive into the art of making Mini Japanese Rice Balls, or as they’re lovingly known in Japan, Onigiri. This isn’t just a cooking session—it’s a cultural expedition, a bonding experience, and, most importantly, a whole lot of fun. So, let’s roll up our sleeves, wash our hands, and get ready to create some delicious memories!
Table of Contents
Setting the Scene: A Mini Japanese Festival
To start our journey, let’s transform our kitchen into a mini Japanese festival. Play some traditional Japanese music, lay out some colorful placemats, and if you have any Japanese decorations, now’s the time to show them off! Introduce your kids to Japan with a brief story or fun facts about the country and its cuisine. This is a great way to spark their curiosity and excitement for the cooking ahead.
Rice: The Heart of Onigiri
The foundation of our mini rice balls is, unsurprisingly, rice! But not just any rice – we need sticky rice to make our onigiri hold together. Before cooking, show your little ones the rice grains, let them feel the texture, and explain why sticky rice is essential for making onigiri. Cooking the rice can be an adult task, but kids can help measure the water and rice, turning this into a mini math lesson.
The Cool-Down: A Lesson in Patience
Once the rice is cooked, it needs to cool down a bit. This is a fantastic opportunity to teach kids about patience and the importance of handling food safely. They can fan the rice with a piece of cardboard or a large book, turning cooling down into a fun game. Explain how this also helps make the rice shiny and even tastier!
Shape and Create Mini Japanese Rice Balls: The Fun Begins
Here’s where the real fun starts! Set up a station with bowls of water and salt for dipping hands to prevent sticking. Show your kids how to wet their hands, sprinkle them with salt (which also adds flavor), and take a scoop of rice. Guide them through the process of gently shaping the rice into a ball or a triangle. This hands-on activity is not only enjoyable but also helps develop their motor skills.
Filling with Flavors: A Surprise Inside
Before sealing up those rice balls, it’s time to decide on the fillings. This can range from cooked salmon or tuna to pickled plums (umeboshi) or avocado slices. Let your kids pick their fillings and place a small amount in the center of their rice ball. This step is like a culinary treasure hunt, with each rice ball hiding a delicious secret.
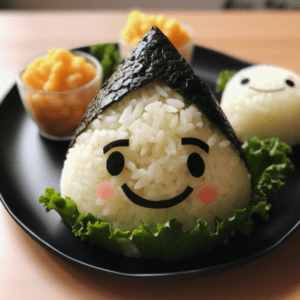
Decorating with Nori: The Final Touch
Now, let’s dress up those rice balls! Cut strips or shapes from sheets of nori (seaweed) and let the kids decorate their onigiri. They can wrap a strip around the middle, create faces, or make abstract designs. This not only adds flavor and nutrition but also turns each rice ball into a work of art.
The Tasting Ceremony: Celebrating Your Creations
With the onigiri made, it’s time for the most anticipated part – tasting! Gather around the table and let everyone try their handcrafted rice balls. Discuss the different flavors, what everyone liked about making them, and what they learned about Japanese culture.

Sharing the Joy: Onigiri for Everyone
In the spirit of Japanese hospitality and sharing, encourage your kids to make a rice ball for another family member or to save some for a shared meal. This teaches them about generosity and the joy of sharing food they’ve made with their own hands.
Cleanup Time: Teamwork in Action
After enjoying your tasty creations, it’s time to clean up. Encourage your children to help, turning clean-up time into another fun activity. Assign simple tasks and maybe race to see who can complete their cleaning task first. It’s a great way to teach responsibility and teamwork.
Reflecting on Your Culinary Adventure
As you finish up, take a moment to reflect on the experience. Talk about what everyone enjoyed most, what you all learned, and how you felt connecting with a different culture through food. You could even plan your next culinary adventure!
Continuing the Journey: Beyond the Rice Ball
Making Kiddo’s Mini Japanese Rice Balls is more than just preparing a snack; it’s a doorway to learning about different cultures, exploring new flavors, and spending quality time together. Each grain of rice holds the potential for discovery, creativity, and joy.
So, here’s to our mini rice balls and to all the little hands that helped make them. May this be just the beginning of many more culinary adventures around the world. Keep exploring, keep cooking, and most importantly, keep enjoying these moments together.
Until our next delicious journey, happy cooking and joyful eating! Sayonara for now, and remember, the world is just a recipe away!
Bon Appétit, or as they say in Japan, Itadakimasu! 🍴✨
Kiddo’s Mini Japanese Rice Balls (Onigiri)
Equipment
Equipment and Ingredient sections may contain affiliate links to items we use and love.
Ingredients
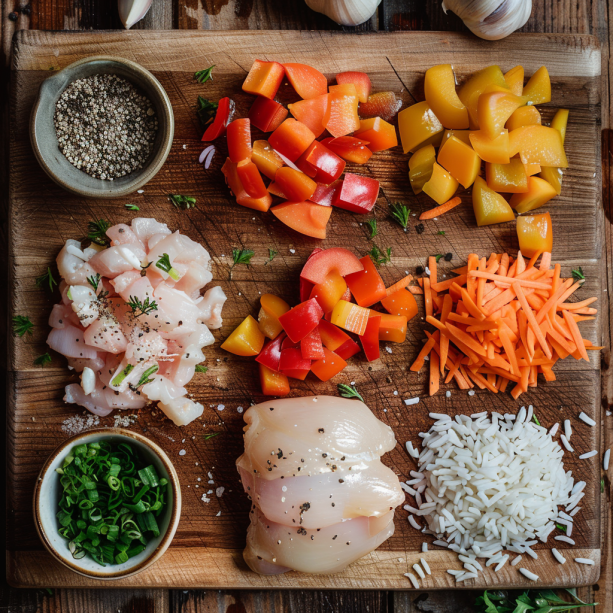
- 2 cups sushi rice, or any short-grain rice
- 2 ½ cups water
- This section may contain affiliate links to products we know and love.Salt
- Fillings of your choice:
- Tuna mayo mix
- Teriyaki chicken bits
- Cooked vegetables, like carrots or spinach
- Cheese cubes, for an international twist!
- Nori, seaweed sheets (optional)
- Soy sauce for dipping, optional
Instructions
- Rinse the rice in a colander until the water runs clear.
- Cook the rice in the rice cooker or a pot with the 2 ½ cups of water.
- Once the rice is cooked, let it cool down a bit until it’s warm (but not hot) to touch.
- Prepare your fillings – whether it’s mixing the tuna with mayo, chopping veggies, or getting those cheese cubes ready.
- With a bowl of cold water nearby, wet your hands and sprinkle them with salt.
- Take a handful of warm rice and place a spoonful of your chosen filling in the center.
- Mold the rice around the filling, shaping it into a triangle, round, or any shape your kiddo fancies!
- If using nori, cut them into strips or use the puncher for cute shapes and wrap around or place on the rice ball.
- Serve with a small dish of soy sauce for dipping!
Notes
Nutrition
Kitchen Gear and Equipment We Use and Love
I just wanted to let you know that some of the links on this page are affiliate links. This means that if you click on these links and make a purchase, I may earn a small commission at no extra cost to you. Rest assured, I only recommend products and services that I personally use and love. Your support through these links helps me continue to create valuable content and keep this blog running. I appreciate your support!

Kismile Nugget Countertop Ice Maker, Portable Pellet Ice Maker, 35 lbs/Day Chewable Ice, Self-Cleaning,Pebble Ice Maker for Home/Kitchen/Office(Stainless Steel Black)
$179.99 (as of June 29, 2024 19:37 GMT -04:00 - More infoProduct prices and availability are accurate as of the date/time indicated and are subject to change. Any price and availability information displayed on [relevant Amazon Site(s), as applicable] at the time of purchase will apply to the purchase of this product.)
Vosda Parchment Paper Sheets for Baking 9-13 IN Precut Non-Stick Parchment Paper Unbleached Baking Sheet Paper for Air Fryer,Baking,Sandwich,Grilling,Steaming,Suitable For Bread Cake Cookies 120p
$6.99 (as of June 29, 2024 19:36 GMT -04:00 - More infoProduct prices and availability are accurate as of the date/time indicated and are subject to change. Any price and availability information displayed on [relevant Amazon Site(s), as applicable] at the time of purchase will apply to the purchase of this product.)
Portable Washing Machine with 3 Intelligent Cleaning Modes,11L Mini Washer with Foldable Design,Mini Folding Washing for Travel,Camping,Apartment,Dorm,Baby Clothes,Socks,Underwear
$49.99 (as of June 29, 2024 19:37 GMT -04:00 - More infoProduct prices and availability are accurate as of the date/time indicated and are subject to change. Any price and availability information displayed on [relevant Amazon Site(s), as applicable] at the time of purchase will apply to the purchase of this product.)
CAKETIME Silicone Mini Muffin Pan, 24 Cups Nonstick Mini Cupcake Pan for Baking Mini Muffin, Mini Cupcake, Mini Egg Bites, Mini Fat Bomb, 1 Pack Confetti
$9.99 (as of June 29, 2024 19:36 GMT -04:00 - More infoProduct prices and availability are accurate as of the date/time indicated and are subject to change. Any price and availability information displayed on [relevant Amazon Site(s), as applicable] at the time of purchase will apply to the purchase of this product.)