Mini Cheeseburger Sliders: An Easy and Fun Family Dinner Adventure
Summary
Imagine mini-sized hamburgers, perfect for little hands to hold, with an explosion of flavors that’ll make the whole family cheer. These Mini Cheeseburger Sliders will not only make dinner fun but also offer a wholesome meal for the kiddos. Let’s embark on a culinary adventure and make memories around the dinner table!
Table of Contents
Why You’ll Love This Recipe
- Kid-Friendly: Perfect for little hands to help make and enjoy.
- Versatile: Mix and match toppings to customize each slider.
- Quick & Easy: Ready in under 30 minutes.
- Nutritious & Tasty: Lean beef, veggies, and cheese in every bite.
- Budget-Friendly: Estimated cost is around $15 for 8 sliders.
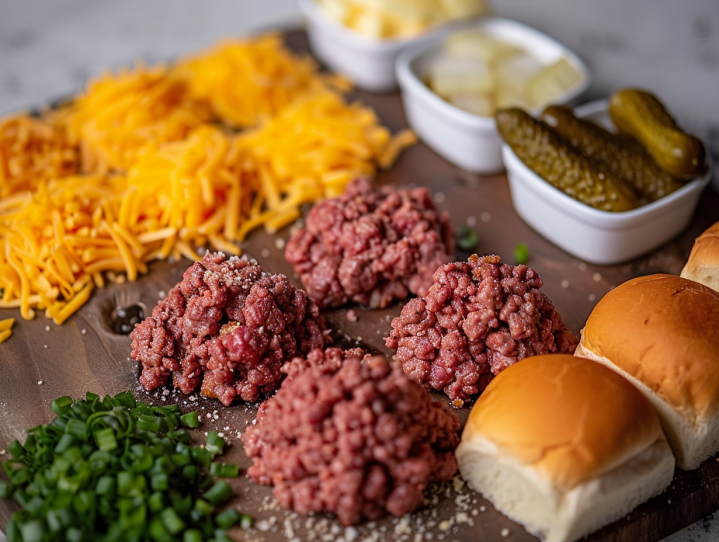
Ingredients Needed
For the Patties:
- 1 lb lean ground beef
- 1/4 cup breadcrumbs
- 1/4 cup grated cheddar cheese
- 1 egg (beaten)
- 1 tsp garlic powder
- 1/2 tsp onion powder
- Salt & pepper to taste
For Assembly:
- 8 mini slider buns
- Lettuce
- Tomato slices
- Pickles
- Ketchup, mayo, or any other preferred sauces
Equipment Needed
- Large mixing bowl
- Skillet or grilling pan
- Spatula
How to Make Mini Cheeseburger Sliders
Step 1: Prepare the Patties
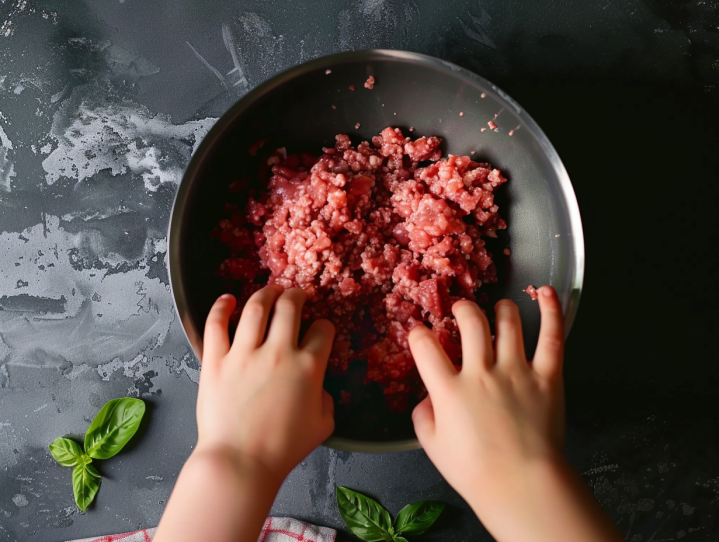
- Combine Ingredients: In a large mixing bowl, combine ground beef, breadcrumbs, grated cheddar, beaten egg, garlic powder, onion powder, salt, and pepper.
- Mixing Fun: Get the kids involved by letting them mix everything with their hands (after a good wash, of course!). It’s squishy fun!
- Form Patties: Divide the mixture into 8 equal portions. Roll each into a ball and then flatten into patties.
Step 2: Cook the Patties
- Heat the Skillet: Heat the skillet or grilling pan over medium heat. Once hot, carefully place the patties onto the pan.
- Cook Patties: Cook the patties for about 4 minutes on each side or until fully cooked through and slightly browned on the outside.
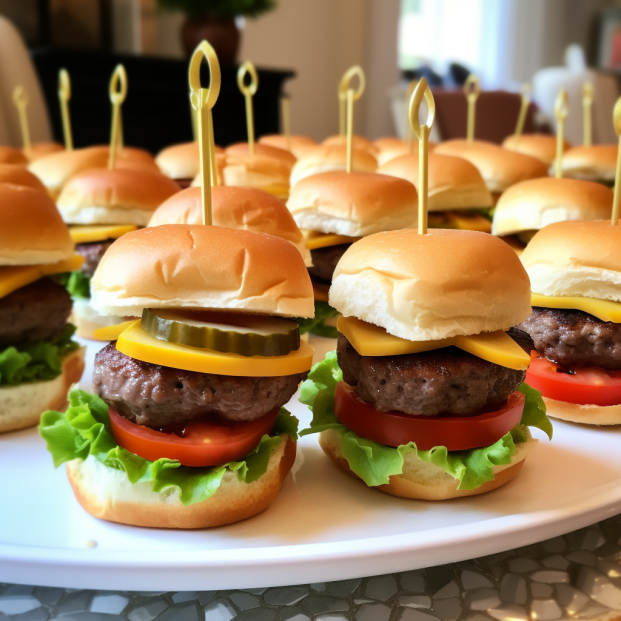
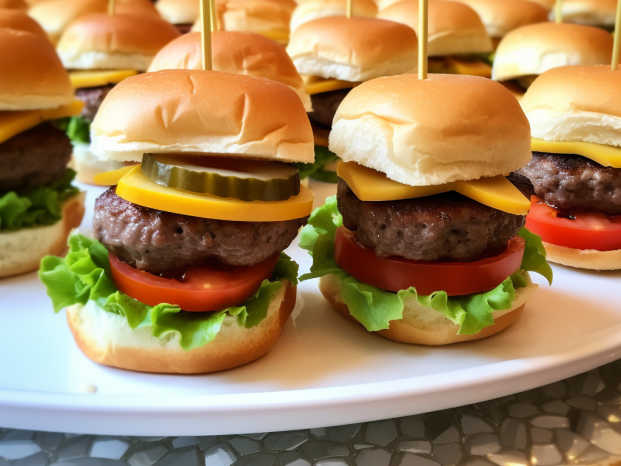
Step 3: Assemble the Sliders
- Bottom Bun: Place a lettuce leaf on the bottom half of each slider bun.
- Add Patty: Place a patty on top of the lettuce.
- Top it Off: Add a slice of tomato and a pickle. Top with the other half of the bun. Add a tiny dollop of ketchup or mayo if desired.
- Serve Immediately: Serve with baked sweet potato fries or a fresh salad.
How Kids Can Help
Making Mini Cheeseburger Sliders is an ideal recipe to involve your little chefs:
- Mixing: They’ll love squishing the ground beef mixture with their hands.
- Forming Patties: Teach them to roll and flatten the patties into shape.
- Assembling Sliders: They can stack lettuce, patties, and toppings with glee.
- Serving: Kids can proudly serve their creations to the family.
A Personal Story From a Reader: Making Mini Cheeseburger Sliders with My Kids
There’s a certain magic that fills the kitchen when kids get involved. Last Sunday, my two little chefs, Lily and Max, and I decided to go on a new culinary adventure: Mini Cheeseburger Sliders. The recipe promised juicy patties, endless giggles, and unforgettable family memories. And let me tell you, it delivered.
The Preparation
After breakfast, I called out, “Who’s ready to make some mini sliders?”
Lily and Max darted into the kitchen with bright smiles and eager eyes. We quickly assembled all the ingredients on the counter:
- 1 lb lean ground beef
- 1/4 cup breadcrumbs
- 1/4 cup grated cheddar cheese
- 1 egg, beaten
- 1 tsp garlic powder
- 1/2 tsp onion powder
- Salt & pepper to taste
- 8 mini slider buns
- Lettuce, tomato slices, and pickles
- Ketchup and mayo
Mixing the Patties
We rolled up our sleeves and got our hands ready for some squishy fun.
“Can I crack the egg, Mom?” Max asked, hopping on his tiptoes to see over the counter.
“Sure thing, buddy!” I said, guiding his little hands.
With the egg cracked and mixed into the bowl, Lily took charge of sprinkling in the breadcrumbs and grated cheddar while Max poured in the garlic and onion powders. Finally, we added the salt, pepper, and ground beef.
“All right, team, let’s mix it up!” I cheered.
The kids dove in with their freshly washed hands, squishing and squeezing the mixture until everything was combined. They laughed as their fingers got sticky with the meat.
Forming the Patties
Next came the fun part: rolling the meat into little balls and flattening them into patties.
“Make them about this size,” I demonstrated with my hands.
Lily and Max rolled the mixture into small, perfectly imperfect balls before squashing them down with giggles.
“We’re making burgers!” Max sang as he shaped another patty.
We lined up our eight patties neatly on a plate and headed to the stove.
Cooking Time
I carefully placed the patties into a heated skillet while the kids stood on their step stools, peeking over the edge to watch them sizzle.
“Do they look done yet?” Lily asked after just a minute.
“Almost!” I said, flipping the patties after 4 minutes on each side.
The kitchen soon filled with the mouth-watering aroma of juicy beef patties and melted cheese.
Assembling the Sliders
Once the patties were done, the assembly line began.
“Lettuce first,” I instructed.
Lily and Max layered the lettuce leaves on the bottom half of each slider bun. I added a patty to each, and then the kids topped them with tomato slices and pickles. A dollop of ketchup and mayo, and we popped the tops on.
“They’re so cute!” Lily squealed, admiring the mini burgers.
The Grand Feast
We arranged the sliders on a platter and served them with a side of baked sweet potato fries. Sitting down at the table, the kids beamed with pride.
“These are the best burgers ever!” Lily declared, her mouth full.
“We should make these every day!” Max added between bites.
Their enthusiasm warmed my heart, and I couldn’t help but smile. These mini sliders were not just a meal—they were a celebration of family, fun, and togetherness.
Final Thoughts
Making Mini Cheeseburger Sliders with Lily and Max was a joyful reminder of the magic of cooking with kids. The laughter, the mess, and the proud smiles made every minute in the kitchen worth it. We’ll definitely be making these again soon, and I hope this story inspires you to share a similar adventure with your little chefs. Here’s to happy tummies and even happier memories!
How to Store Leftovers
- Refrigerator: Store cooked patties and buns separately in airtight containers in the fridge for up to 3 days.
- Freezer: Freeze cooked patties on a baking sheet, then transfer to a freezer bag. Keep for up to 2 months.
- Reheat: Reheat in the microwave for 1-2 minutes or in a skillet over medium heat until warm.
Substitutions and Additions
Substitutions
- Ground Meat Alternatives:
- Turkey or Chicken: Replace beef with ground turkey or chicken.
- Plant-Based Patties: Use plant-based ground meat alternatives.
- Breadcrumbs:
- Gluten-Free: Substitute with gluten-free breadcrumbs or oats.
- Crushed Crackers: Use crushed crackers for extra flavor.
- Cheddar Cheese:
- Swiss, Mozzarella, or Pepper Jack: Replace cheddar with your favorite cheese.
Additions
- Vegetable Toppings:
- Avocado, Caramelized Onions, or Mushrooms: Add for extra flavor.
- Grilled Pineapple: Add a sweet and tangy twist.
- Sauces:
- BBQ Sauce: Add a smoky flavor.
- Chipotle Mayo: Spicy and creamy!
Frequently Asked Questions (FAQ)
Q: Can I make these sliders ahead of time?
A: Yes! Prepare the patties and store them in the refrigerator. Cook them right before serving.
Q: How do I keep the patties from falling apart?
A: Make sure to use an egg and breadcrumbs in the mixture, and don’t overmix.
Q: Can I bake the patties instead of frying them?
A: Definitely! Bake at 375°F (190°C) for about 12-15 minutes or until fully cooked.
Q: Are there any low-carb bun options?
A: Yes! Use lettuce leaves or low-carb buns for a keto-friendly option.
Q: What other side dishes can I serve with these sliders?
A: Baked sweet potato fries, a fresh salad, or roasted vegetables make great sides.
Additional Tips for Perfect Sliders
- Don’t Overcook Patties: Lean meat dries out quickly, so keep an eye on them.
- Customize Toppings: Create a toppings bar and let everyone build their own sliders.
- Make Them Fun: Use toothpicks to hold sliders together and add colorful flags!
Final Thoughts
Making these Mini Cheeseburger Sliders is a joyful experience that brings the whole family together. From the giggles during the mixing process to the proud smiles as kids serve their creations, this recipe is more than just dinner—it’s an adventure. So gather your little chefs and embark on this flavorful journey. Here’s to happy tummies and happier memories!

Little Chefs’ Juicy Sliders
Equipment
Equipment and Ingredient sections may contain affiliate links to items we use and love.
Ingredients
- 1 lb This section may contain affiliate links to products we know and love.Lean Ground Beef
- 1/4 cup This section may contain affiliate links to products we know and love.Breadcrumbs
- 1/4 cup This section may contain affiliate links to products we know and love.Cheddar Cheese
- 1 This section may contain affiliate links to products we know and love.Eggs, beaten
- 1 tsp This section may contain affiliate links to products we know and love.Garlic Powder
- 1/2 tsp This section may contain affiliate links to products we know and love.Onion Powder
- This section may contain affiliate links to products we know and love.Salt and Pepper
- 8 This section may contain affiliate links to products we know and love.Mini Slider Buns
- This section may contain affiliate links to products we know and love.Lettuce, tomato slices, and pickles for garnish
- This section may contain affiliate links to products we know and love.Ketchup, mayo, or any other preferred sauces
Instructions
- In the large mixing bowl, combine ground beef, breadcrumbs, grated cheddar, beaten egg, garlic powder, onion powder, salt, and pepper. Get the kids involved here, let them mix with their hands (after a good wash, of course!). It’s squishy fun!
- Divide the mixture into 8 equal portions. Roll them into balls and then flatten into patties. Little helpers will love this step.
- Heat the skillet or grilling pan over medium heat. Once hot, carefully place the patties onto the pan.
- Cook the patties for about 4 minutes on each side or until fully cooked through and slightly browned on the outside.
- To assemble, place a lettuce leaf on the bottom half of each slider bun, followed by a patty, a slice of tomato, and a pickle. Top with the other half of the bun. Add a tiny dollop of ketchup or mayo if desired.
- Serve immediately with a side of baked sweet potato fries or a fresh salad.
Notes
Nutrition
Kitchen Gear and Equipment We Use and Love
I just wanted to let you know that some of the links on this page are affiliate links. This means that if you click on these links and make a purchase, I may earn a small commission at no extra cost to you. Rest assured, I only recommend products and services that I personally use and love. Your support through these links helps me continue to create valuable content and keep this blog running. I appreciate your support!

Amazon Basics Parchment Paper, 90 Sq Ft Roll
$5.26 (as of June 29, 2024 19:36 GMT -04:00 - More infoProduct prices and availability are accurate as of the date/time indicated and are subject to change. Any price and availability information displayed on [relevant Amazon Site(s), as applicable] at the time of purchase will apply to the purchase of this product.)
Replacement Straw Compatible with Stanley 40 oz 30 oz Cup Tumbler, 6 Pack Reusable Straw with Cleaning Brush, Plastic, Clear
$5.99 (as of June 29, 2024 19:37 GMT -04:00 - More infoProduct prices and availability are accurate as of the date/time indicated and are subject to change. Any price and availability information displayed on [relevant Amazon Site(s), as applicable] at the time of purchase will apply to the purchase of this product.)
FRIGIDAIRE Gallery EFIC255 Countertop Crunchy Chewable Nugget Ice Maker, 44lbs per Day, Auto Self Cleaning, 2.0 Gen, Cream
$89.98 (as of June 29, 2024 19:37 GMT -04:00 - More infoProduct prices and availability are accurate as of the date/time indicated and are subject to change. Any price and availability information displayed on [relevant Amazon Site(s), as applicable] at the time of purchase will apply to the purchase of this product.)
Upstreman 3.2 Cu.Ft Mini Fridge with Freezer, Single Door Mini Fridge, Adjustable Thermostat, Mini Refrigerator for Bedroom, Office, Dorm, Black-BR321
$179.99 (as of June 29, 2024 19:37 GMT -04:00 - More infoProduct prices and availability are accurate as of the date/time indicated and are subject to change. Any price and availability information displayed on [relevant Amazon Site(s), as applicable] at the time of purchase will apply to the purchase of this product.)