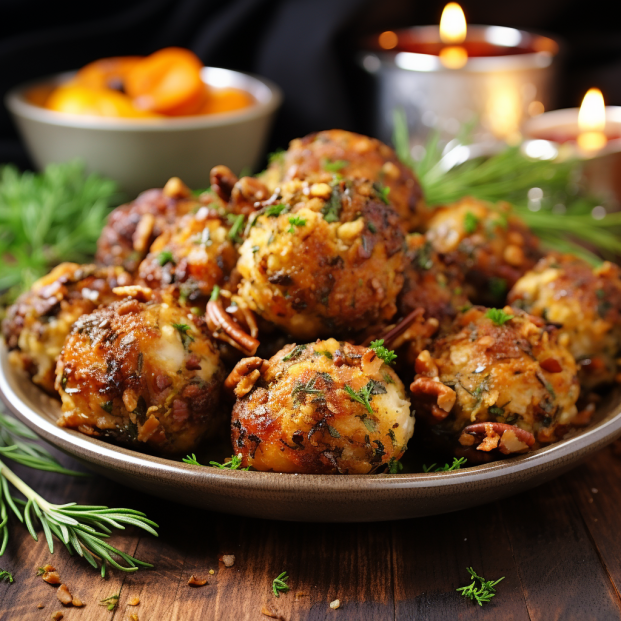
Crafting Memories with Crispy Stuffing Balls
Welcome, culinary adventurers and little chefs! Today, we’re diving into a world filled with herbs, breadcrumbs, and warm, savory flavors as we tackle Crispy Stuffing Balls. This isn’t just a recipe; it’s a journey into the heart of family cooking, where every step is a chance to learn, laugh, and create lasting memories. So tie those apron strings, wash those little hands, and let’s get started on our comforting, delicious venture!
Table of Contents
The Gathering of Ingredients: A Flavorful Quest
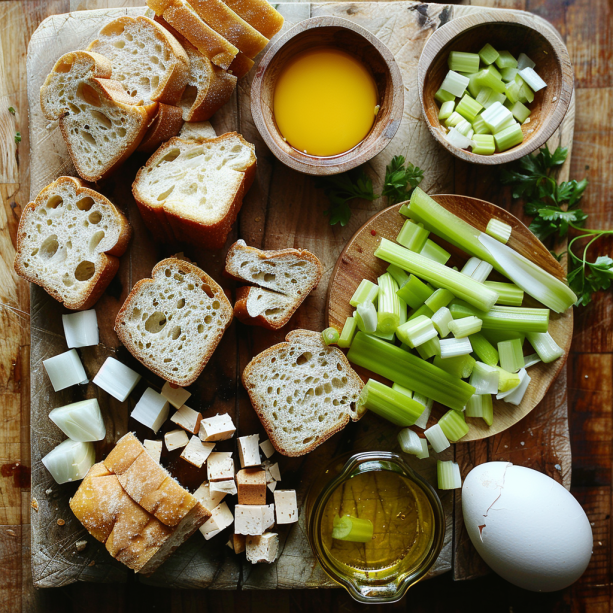
Our Thanksgiving Stuffing Balls adventure begins with gathering our ingredients, which is the perfect opportunity to turn your kitchen into a culinary treasure island. Let your junior chefs be the treasure hunters, fetching bread, herbs, and butter. Each ingredient tells a story—from the earthy sage to the rustic bread—and shares these tales to spark curiosity and a love for natural flavors.
The Art of Crumbling: A Task for Eager Hands
Once all your ingredients are ready, it’s time for the fun part: crumbling the bread. This is where kiddos shine! Let them tear the bread into small pieces (no perfection needed here, just fun, uneven chunks). This tactile experience is not just enjoyable; it helps develop their motor skills and allows them to feel directly involved in the meal’s creation.
Herb Magic: A Sprinkle of Nature’s Flavors
Now, introduce your mini chefs to the herbs. Let them smell and maybe even taste a tiny bit of each herb. Discuss how these green wonders transform our stuffing balls from ordinary to extraordinary. Under your supervision, they can help sprinkle and mix the herbs into the breadcrumbs, turning this step into a sensory exploration.
The Butter Meltdown: A Lesson in Transformation
Melting butter is next, and while it’s a job for adults, it doesn’t mean kids can’t be involved. Let them watch from a safe distance, explaining how solid butter becomes liquid with heat. Discuss the role of butter in our recipe – how it adds flavor and binds our ingredients. They can even help pour the melted butter into the mixture (with your guidance, of course).
The Great Mix-Up: Stirring Up Fun
Once all our ingredients are united in one bowl, it’s time to mix. Give each child a turn to stir the mixture, combining all the lovely flavors. This communal activity not only involves them in the cooking process but also teaches them about mixing and blending different components.
Ball Formation: Rolling into Fun
Now, the creative part – forming the stuffing into balls. This is an excellent task for little hands. Show them how to scoop the mixture and gently roll it between their hands to form balls. Not only is this a fun, play-like activity, but it’s also a fantastic way for kids to contribute significantly to the meal.
Oven Time: Patience and Anticipation
While only adults should handle the hot oven, kids can help with setting the kitchen timer and watching the oven (from a safe distance). Use this waiting time to discuss patience in cooking and how some good things, like our stuffing balls, are worth the wait.
Tasting Session: The Flavorful Reward of Crispy Stuffing Balls
Once safely cooked and cooled, it’s time for the best part: tasting. Let everyone have a sample and share their thoughts. This is a wonderful opportunity to discuss flavors, textures, and what they liked best about the cooking process.
Sharing the Joy: A Lesson in Generosity
Encourage your children to share their stuffing balls with family members or save some for a shared meal. Discuss the importance of sharing and how food can bring people together.
Clean-Up Crew: Teamwork in Action
After cooking, involve the kids in the cleanup process. Assign age-appropriate tasks and turn them into a game to keep things fun and engaging. This teaches responsibility and respect for their cooking space.
Reflect and Relish: Cherishing the Experience
End your cooking adventure with a reflection session. Talk about what everyone learned and what they enjoyed the most. Capture these moments with photos or drawings, creating a lasting memory of your shared culinary journey.
The Takeaway: More Than Just a Meal
Creating Crispy Stuffing Balls is about more than just preparing a crispy Thanksgiving stuffing recipe; it’s about igniting a love for cooking, fostering family bonds, and making the kitchen a place of joy and discovery. Each step, from tearing bread to rolling stuffing balls, is a chance for kids to learn, contribute, and feel proud of their creations.
So here’s to our stuffing balls, the laughter shared, and the warm, delicious memories created. May your kitchen always be a place of adventure, learning, and love. Until our next culinary journey, keep exploring, keep cooking, and keep creating those precious, tasty moments together.
Bon Appétit and Happy Cooking!

Crispy Stuffing Balls
Equipment
Equipment and Ingredient sections may contain affiliate links to items we use and love.
Ingredients
- 6 cups of day-old bread, torn into small pieces
- 2 This section may contain affiliate links to products we know and love.Eggs, beaten
- 1 cup This section may contain affiliate links to products we know and love.Vegetable Broth
- 1/2 cup celery, finely chopped
- 1/2 cup This section may contain affiliate links to products we know and love.Onion, finely chopped
- 1/4 cup This section may contain affiliate links to products we know and love.Butter, melted
- 2 teaspoons poultry seasoning
- 1/2 teaspoon This section may contain affiliate links to products we know and love.Salt
- 1/4 teaspoon This section may contain affiliate links to products we know and love.Salt and Pepper
- 2 tablespoons This section may contain affiliate links to products we know and love.Parsley, chopped
Instructions
- Preheat your oven to 375°F (190°C) and ask an adult to help you line a baking sheet with parchment paper.
- In a large mixing bowl, combine torn bread, celery, onions, and parsley.
- In a separate bowl, whisk together the eggs, melted butter, chicken broth, poultry seasoning, salt, and pepper.
- Pour the wet mixture over the bread mixture. Stir until everything is well-coated and moistened.
- Using your hands, shape the mixture into golf-ball-sized balls and place them on the prepared baking sheet.
- Ask an adult to place the baking sheet into the oven. Bake for about 20-25 minutes or until golden brown and crispy.
- Once done, let them cool slightly and serve with gravy or cranberry sauce.
Notes
Nutrition
Kitchen Gear and Equipment We Use and Love
I just wanted to let you know that some of the links on this page are affiliate links. This means that if you click on these links and make a purchase, I may earn a small commission at no extra cost to you. Rest assured, I only recommend products and services that I personally use and love. Your support through these links helps me continue to create valuable content and keep this blog running. I appreciate your support!

AGLUCKY Nugget Ice Makers Countertop,Portable Pebble Ice Maker Machine with Soft Chewable Ice,35Lbs/24H,One-Click Operation,Self-Cleaning,Crushed Ice Maker for Home/Kitchen(Stainless Steels Silver)
$199.99 (as of June 29, 2024 19:37 GMT -04:00 - More infoProduct prices and availability are accurate as of the date/time indicated and are subject to change. Any price and availability information displayed on [relevant Amazon Site(s), as applicable] at the time of purchase will apply to the purchase of this product.)
KitchenAid Classic Multifunction Can Opener / Bottle Opener
$9.68 (as of June 30, 2024 19:42 GMT -04:00 - More infoProduct prices and availability are accurate as of the date/time indicated and are subject to change. Any price and availability information displayed on [relevant Amazon Site(s), as applicable] at the time of purchase will apply to the purchase of this product.)
Doghly Compact Mini Twin Tub Washing Machine with Drying Rack, 11lbs Portable Laundry Washer and 7lbs Spinner, Convenient and Efficient for Dorms, Apartment (18lbs)
$102.99 (as of June 30, 2024 19:42 GMT -04:00 - More infoProduct prices and availability are accurate as of the date/time indicated and are subject to change. Any price and availability information displayed on [relevant Amazon Site(s), as applicable] at the time of purchase will apply to the purchase of this product.)
dokaworld Glass Food Storage Containers With Acacia Lids – Amber Glass Meal Prep Containers Set – 4 Airtight Stackable Food Storage Kitchen Containers – Eco-Friendly Oven Safe Nesting Lunch Containers
$19.99 (as of June 30, 2024 19:42 GMT -04:00 - More infoProduct prices and availability are accurate as of the date/time indicated and are subject to change. Any price and availability information displayed on [relevant Amazon Site(s), as applicable] at the time of purchase will apply to the purchase of this product.)