Bringing Back the Nostalgia: Classic School Lunch Cafeteria Pizza
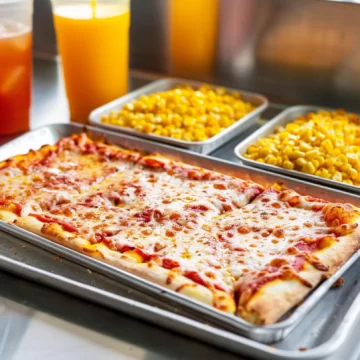
If you’ve ever enjoyed a slice of school cafeteria pizza, you know just how comforting and delicious it can be. There’s something truly special about the soft, chewy crust, tangy tomato sauce, and gooey melted cheese that brings back fond memories of lunchtime with friends. Today, we’re bringing that nostalgia right into your kitchen with a recipe for Classic School Lunch Cafeteria Pizza. This rectangular pizza is sure to be a hit, perfect for a family dinner, kids’ party, or a trip down memory lane.
Table of Contents
Why You’ll Love This Recipe
- Nostalgic Flavor: Reminiscent of school days, this pizza brings back the comforting taste of cafeteria lunches.
- Easy to Make: With simple ingredients and clear instructions, anyone can make this pizza at home.
- Kid-Friendly: Kids will love both helping to make and eating this delicious pizza.
- Customizable: You can easily adapt the toppings to suit everyone’s preferences.
- Perfect for Gatherings: Ideal for family dinners, parties, or even meal prep.
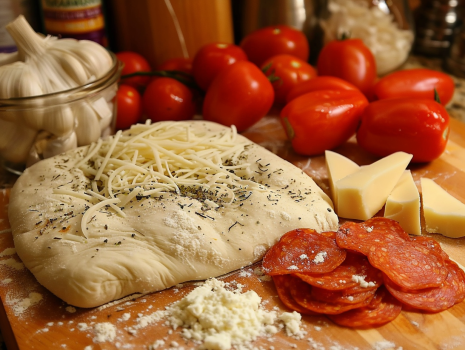
Ingredients Needed for Classic School Lunch Cafeteria Pizza
Here’s everything you need to make this Classic School Lunch Cafeteria Pizza:
- For the Dough:
- 3 1/2 cups all-purpose flour
- 1 tablespoon sugar
- 1 packet (2 1/4 teaspoons) active dry yeast
- 1 teaspoon salt
- 1 1/4 cups warm water (110°F)
- 2 tablespoons olive oil
- For the Sauce:
- 1 cup tomato sauce
- 1 teaspoon dried oregano
- 1 teaspoon dried basil
- 1/2 teaspoon garlic powder
- 1/2 teaspoon onion powder
- Salt and pepper to taste
- For the Toppings:
- 2 cups shredded mozzarella cheese
- 1/2 cup grated Parmesan cheese
- Optional: pepperoni slices, diced bell peppers, sliced olives, or any favorite toppings
How Kids Can Help
Cooking with kids is a wonderful way to bond and teach them valuable skills. Here’s how your little chefs can assist with making this cafeteria pizza:
- Mixing the Dough: Kids can help measure and mix the ingredients for the dough.
- Kneading the Dough: Let them knead the dough—it’s like playtime with a delicious outcome!
- Spreading the Sauce: Kids can spread the tomato sauce evenly over the dough.
- Adding Toppings: They’ll love sprinkling cheese and arranging toppings on the pizza.
Step-by-Step Instructions
1. Prepare the Dough
- Mix Dough: In a mixing bowl, combine warm water, sugar, and yeast. Let sit for 5 minutes until foamy.
- Combine Ingredients: Add flour, salt, and olive oil to the yeast mixture. Mix until the dough comes together.
- Knead Dough: Knead the dough on a floured surface for about 5-7 minutes until smooth and elastic. Alternatively, use a stand mixer with a dough hook.
- Let Dough Rise: Place the dough in a greased bowl, cover with a clean kitchen towel, and let rise in a warm place for about 1 hour or until doubled in size.
2. Prepare the Sauce
- Mix Sauce Ingredients: In a small bowl, combine the tomato sauce, oregano, basil, garlic powder, onion powder, salt, and pepper. Stir well.
3. Assemble the Pizza
- Preheat Oven: Preheat your oven to 450°F (230°C). Line a rectangular baking sheet with parchment paper.
- Roll Out Dough: Punch down the dough and roll it out on a floured surface to fit the baking sheet.
- Transfer Dough: Place the rolled-out dough onto the prepared baking sheet.
- Add Sauce: Spread the tomato sauce evenly over the dough.
- Add Toppings: Sprinkle the shredded mozzarella and Parmesan cheese evenly over the sauce. Add any additional toppings as desired.
4. Bake the Pizza
- Bake: Place the pizza in the preheated oven and bake for about 15-20 minutes or until the crust is golden brown and the cheese is melted and bubbly.
- Cool and Slice: Let the pizza cool for a few minutes, then slice into 12 rectangular pieces using a knife or pizza cutter.
5. Serve
- Serve Warm: Serve the pizza warm and enjoy the nostalgic taste of school lunch!

How to Store Leftovers
If you have any leftovers, here’s how to store them:
- Refrigeration: Store any leftover pizza slices in an airtight container in the refrigerator for up to 3 days. Reheat in the microwave or oven before serving.
- Freezing: To freeze, wrap each slice in plastic wrap and place in a freezer bag. Store for up to 1 month. Reheat in the oven or microwave.
Substitutions and Additions
- Cheese Alternatives: Try using cheddar, provolone, or a blend of cheeses for different flavors.
- Topping Options: Experiment with different toppings like mushrooms, onions, sausage, or spinach.
- Gluten-Free Option: Use a gluten-free flour blend to make the dough suitable for those with gluten intolerance.
Frequently Asked Questions
Q: Can I use store-bought dough for this recipe? A: Yes, store-bought dough can be a convenient alternative if you’re short on time.
Q: What’s the best way to reheat leftover pizza? A: Reheat pizza slices in the oven at 350°F for about 10 minutes or in the microwave for 1-2 minutes.
Q: Can I make this pizza ahead of time? A: Yes, you can prepare the dough and sauce in advance. Store the dough in the refrigerator overnight and assemble and bake the pizza the next day.
Reasons to Love This Recipe
- Easy to Make: Simple ingredients and clear instructions make this recipe accessible for all skill levels.
- Versatile: Customize with your favorite toppings to suit everyone’s taste.
- Family-Friendly: Kids will love helping to make and eat this delicious pizza.
- Nostalgic: Enjoy the comforting taste of classic cafeteria pizza at home.
Nutritional Value
- Calories: 220 per slice
- Protein: 10g
- Carbohydrates: 28g
- Fat: 8g
- Saturated Fat: 3.5g
- Cholesterol: 15mg
- Sodium: 350mg
- Fiber: 1g
- Sugar: 2g
Shortcuts and Alternatives
- Use Pre-Made Dough: Save time by using store-bought pizza dough.
- Pre-Made Sauce: Use your favorite store-bought pizza sauce for convenience.
- Quick Toppings: Pre-sliced pepperoni, pre-shredded cheese, and canned olives can speed up the preparation process.
History and Cultural Aspects
Pizza originates in Italy and has become a beloved dish worldwide. The concept of school cafeteria pizza is particularly nostalgic for many, evoking memories of lunch breaks with friends and the comforting taste of a classic slice. In the United States, pizza gained immense popularity in the mid-20th century and quickly became a staple in school cafeterias across the country. The rectangular shape and simple toppings made it easy to serve and enjoy, and it remains a favorite among both children and adults today.
Busting Myths
Myth: School cafeteria pizza is unhealthy. Reality: While some versions can be high in calories and fat, making pizza at home allows you to control the ingredients and make healthier choices, such as using whole-grain dough, lean proteins, and plenty of vegetables.
Myth: You need special equipment to make good pizza. Reality: To make delicious pizza at home, all you need is a baking sheet, a mixing bowl, and basic kitchen tools.
Letting Kids Experiment
Encourage your kids to get creative with their pizza:
- Flavor Experimentation: Let them add different spices or herbs to the sauce.
- Toppings: Kids can choose their favorite toppings, such as pineapple, jalapeños, or even anchovies.
- Presentation: Have them arrange the toppings in fun patterns or shapes on the pizza.
Foods That Pair Well with This Dish
- Salad: Serve with a fresh garden salad for a balanced meal.
- Garlic Bread: A side of garlic bread complements the pizza perfectly.
- Soup: Tomato soup or minestrone makes a cozy pairing with pizza.
- Fruit: A bowl of fresh fruit adds a sweet, refreshing touch.
Conclusion
The Classic School Lunch Cafeteria Pizza is a delightful way to bring back the nostalgic flavors of your childhood right into your kitchen. With simple ingredients and easy steps, this recipe is accessible to cooks of all skill levels. Enjoy creating and customizing your own ultimate pizza, and make it a staple in your meal rotation! Whether you stick to the classic recipe or experiment with different variations, this cafeteria pizza is sure to become a favorite in your household.
Classic School Lunch Cafeteria Pizza
Equipment
Equipment and Ingredient sections may contain affiliate links to items we use and love.
Ingredients
For the Dough:
- 3 1/2 cups This section may contain affiliate links to products we know and love.All-Purpose Flour
- 1 tablespoon This section may contain affiliate links to products we know and love.Sugar
- 1 This section may contain affiliate links to products we know and love.packet dry yeast, 2 1/4 teaspoons active dry yeast
- 1 teaspoon This section may contain affiliate links to products we know and love.Salt
- 1 1/4 cups warm water, 110°F
- 2 tablespoons This section may contain affiliate links to products we know and love.Olive Oil
For the Sauce:
- 1 cup This section may contain affiliate links to products we know and love.Tomato Sauce
- 1 teaspoon This section may contain affiliate links to products we know and love.Dried Oregano
- 1 teaspoon Basil
- 1/2 teaspoon This section may contain affiliate links to products we know and love.Garlic Powder
- 1/2 teaspoon This section may contain affiliate links to products we know and love.Onion Powder
- This section may contain affiliate links to products we know and love.Salt and Pepper
For the Toppings:
- 2 cups This section may contain affiliate links to products we know and love.Shredded Cheese
- 1/2 cup This section may contain affiliate links to products we know and love.Parmesean Cheese
Optional:
- pepperoni slices, diced bell peppers, sliced olives, or any favorite toppings
Instructions
Prepare the Dough
- Mix Dough: In a mixing bowl, combine warm water, sugar, and yeast. Let sit for 5 minutes until foamy.
- Combine Ingredients: Add flour, salt, and olive oil to the yeast mixture. Mix until the dough comes together.
- Knead Dough: Knead the dough on a floured surface for about 5-7 minutes until smooth and elastic. Alternatively, use a stand mixer with a dough hook.
- Let Dough Rise: Place the dough in a greased bowl, cover with a clean kitchen towel, and let rise in a warm place for about 1 hour or until doubled in size.
Prepare the Sauce
- Mix Sauce Ingredients: In a small bowl, combine the tomato sauce, oregano, basil, garlic powder, onion powder, salt, and pepper. Stir well.
Assemble the Pizza
- Preheat Oven: Preheat your oven to 450°F (230°C). Line a rectangular baking sheet with parchment paper.
- Roll Out Dough: Punch down the dough and roll it out on a floured surface to fit the baking sheet.
- Transfer Dough: Place the rolled-out dough onto the prepared baking sheet.
- Add Sauce: Spread the tomato sauce evenly over the dough.
- Add Toppings: Sprinkle the shredded mozzarella and Parmesan cheese evenly over the sauce. Add any additional toppings as desired.
Bake the Pizza
- Bake: Place the pizza in the preheated oven and bake for about 15-20 minutes or until the crust is golden brown and the cheese is melted and bubbly.
- Cool and Slice: Let the pizza cool for a few minutes, then slice into 12 rectangular pieces using a knife or pizza cutter.
Serve
- Serve Warm: Serve the pizza warm and enjoy the nostalgic taste of school lunch!
Notes
Cheese Options: Feel free to use a blend of cheeses like cheddar, provolone, or Monterey Jack for different flavors.
Vegetarian Version: Omit the pepperoni and add more veggies like mushrooms, spinach, or tomatoes.
Nutrition
Kitchen Gear and Equipment We Use and Love
I just wanted to let you know that some of the links on this page are affiliate links. This means that if you click on these links and make a purchase, I may earn a small commission at no extra cost to you. Rest assured, I only recommend products and services that I personally use and love. Your support through these links helps me continue to create valuable content and keep this blog running. I appreciate your support!

Measuring Cups and Spoons Set of 7 Stainless Steel for Cooking & Baking
$23.99 (as of July 1, 2024 19:56 GMT -04:00 - More infoProduct prices and availability are accurate as of the date/time indicated and are subject to change. Any price and availability information displayed on [relevant Amazon Site(s), as applicable] at the time of purchase will apply to the purchase of this product.)
Ice Cube Tray for Stanley Cup, Silicone Ice Cube Molds for Stanley 20oz 30oz 40oz Tumbler Cup, Ice Cube Trays with Lids for Chilling Cocktails,Whiskey,Drinks,Coffee (C-Pink)
$11.98 (as of June 28, 2024 19:26 GMT -04:00 - More infoProduct prices and availability are accurate as of the date/time indicated and are subject to change. Any price and availability information displayed on [relevant Amazon Site(s), as applicable] at the time of purchase will apply to the purchase of this product.)
BLUE GINKGO Over the Sink Colander Strainer Basket - Wash Vegetables and Fruits, Drain Cooked Pasta and Dry Dishes - Extendable - New Home Kitchen Essentials (7.9W x 14-19L x 2.75H) - Black
$17.99 (as of July 1, 2024 19:56 GMT -04:00 - More infoProduct prices and availability are accurate as of the date/time indicated and are subject to change. Any price and availability information displayed on [relevant Amazon Site(s), as applicable] at the time of purchase will apply to the purchase of this product.)
Iceman Dual-Size Ice Maker Countertop - Portable Ice Machine, Large and Small Ice Machine Maker with Self Cleaning, 9 Cubes in 7 Mins, 22lbs/24hrs, for Home, Kitchen, Office, Party, Ice Scoop Included
$69.99 (as of June 29, 2024 19:37 GMT -04:00 - More infoProduct prices and availability are accurate as of the date/time indicated and are subject to change. Any price and availability information displayed on [relevant Amazon Site(s), as applicable] at the time of purchase will apply to the purchase of this product.)