A Cheesy Adventure: Making Cheesy Tuna Melts Together
Hello, fellow food explorers and tiny chefs! Today, we’re diving into the ocean of flavors to catch ourselves a cheesy, comforting classic: Cheesy Tuna Melts. But this isn’t just any recipe; it’s a gateway to teaching, bonding, and indulging in cheesy delight with your little ones. So tie those apron strings, wash those tiny hands, and let’s embark on this cheesy adventure together!
Table of Contents
Setting the Scene for Culinary Fun
First off, create a kid-friendly workspace in your kitchen. Lay out your ingredients – canned tuna, cheese, bread, mayo, and any other additions your family loves. Assign tasks suitable for each child’s age and ability. This recipe is not just about making a meal; it’s about creating a shared experience. Remember, in our kitchen, every junior chef is important.
The Tuna Talk: A Lesson in Ingredients
Gather around, team! Let’s talk tuna. Show the kids the cans and discuss why tuna is a great choice for our meal – it’s healthy, packed with protein, and super tasty. As you drain the tuna, let them feel the texture and smell the distinct aroma. This is a perfect moment to introduce them to new foods and discuss the importance of including various proteins in our diets.
Mixing Magic: Creating the Tuna Mixture
Here’s where the little hands get busy. Transfer the tuna to a mixing bowl and let the kids add the mayo and any other seasonings you like. Older children can help with measuring and mixing, while younger ones can stir with a spoon or even their hands (clean, of course!). Talk about each ingredient’s role: Mayo for creaminess, celery for crunch – it’s a culinary symphony waiting to happen!
Spreading Joy: Preparing the Bread
Now, onto the bread. Hand out slices to each child and demonstrate how to spread the tuna mixture evenly. This is about more than just making a sandwich; it’s a lesson in portion control and the art of spreading. Allow them to practice spreading, encouraging their efforts and guiding them gently to cover each slice from crust to crust.
A Blanket of Cheese: The Melting Moment
Ah, the heart of our adventure – the cheese! Discuss the types of cheese you have and let the kids pick their favorite for their melt. This decision-making process gives them a sense of control and personalizes their meal. Watch their faces light up as they place generous slices or sprinkles of cheese over the tuna, covering it like a warm, cheesy blanket.
Toaster Oven Teamwork: Melting into Deliciousness
While the actual toasting should be handled by an adult, kids can help with the prep. Set up the toaster oven tray and let them place their creations on it, ready for melting. As the sandwiches toast under the watchful eye of an adult, explain the melting process and why heat transforms the cheese into gooey deliciousness. Their anticipation will build as they watch through the glass, noses pressed against the cool surface.
The Art of Patience: Waiting for the Golden Melt
Use the short waiting time to engage in a mini-lesson about patience and the importance of cooking food thoroughly. Share stories of your favorite melted cheese experiences or discuss what makes the perfect tuna melt. This not only passes the time but also strengthens the bond over shared stories and expectations.
Setting the Table: The Final Touch
As the cheesy tuna melts turn golden brown, invite the kids to set the table. Encourage them to choose their own plates, cutlery, and perhaps even a napkin color. This involvement in the meal’s final preparation stages reinforces the concept that cooking is more than just making food; it’s about creating an experience.
The Grand Tasting: Savoring Their Creations of Cheesy Tuna Melts
With the table set and the tuna melts perfectly toasted, sit down as a family to enjoy the fruits of your labor. Encourage everyone to describe their melt, what they like about it, and what they might try differently next time. This reflection turns the meal into a valuable learning experience and celebrates their culinary contributions.

Sharing the Love: Encouraging Generosity
After everyone has had their fill, if there are any leftovers, discuss whom they might share them with. Teaching children the joy of sharing food, especially something they’ve made, fosters kindness and community spirit.
Wrapping Up with Cheesy Smiles
Cooking Cheesy Tuna Melts together is more than just preparing a simple meal; it’s an opportunity to teach valuable life skills, from cooking basics to the joy of sharing. Each spread of mayo, each sprinkle of cheese, and each moment of waiting is a step towards building confident, capable little cooks.
So here’s to the messy counters, the cheesy fingers, and the warm smiles. May your kitchen be a place of endless discoveries, shared laughter, and, most importantly, love, one cheesy tuna melt at a time. Happy cooking, families – here’s to many more adventures in the kitchen!
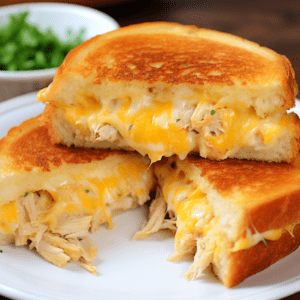
Kid-Friendly Cheesy Tuna Melts
Equipment
Equipment and Ingredient sections may contain affiliate links to items we use and love.
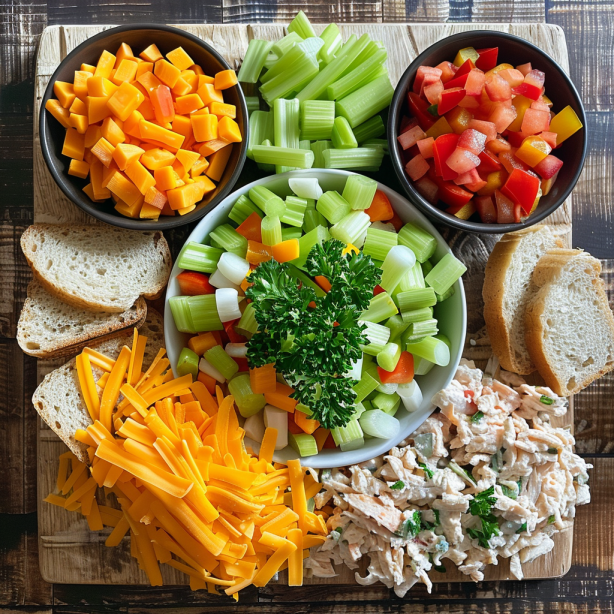
Ingredients
- 2 cans, 5 oz. each tuna in water, drained
- 1/4 cup This section may contain affiliate links to products we know and love.Mayonnaise
- 1/4 cup diced celery, optional
- 1/4 cup diced red bell pepper, optional
- 1 tablespoon This section may contain affiliate links to products we know and love.Fresh Parsley
- 1/2 teaspoon This section may contain affiliate links to products we know and love.Salt and Pepper
- 8 slices of bread, your choice, but whole grain is a great option
- 4 slices This section may contain affiliate links to products we know and love.Cheddar Cheese
- Butter for toasting
Instructions
- Mix the Filling: In a mixing bowl, combine the drained tuna, mayonnaise, celery, red bell pepper, parsley, and black pepper. Mix it well until all ingredients are nicely incorporated.
- Prep the Bread: Lay out the bread slices. Spread the tuna mix generously on 4 of them, and then place a cheese slice over the tuna on each.
- Grill to Perfection: Butter the outside of each slice of bread. Using a skillet or sandwich press, cook each sandwich until the bread is golden brown and the cheese is melting. It’s best to press down occasionally with a spatula.
- Serve and Enjoy: Once cooked, remove from the skillet and let it cool for a minute. Cut into halves or quarters and serve immediately. Perfect with a side of mixed veggies or a simple salad!
Notes
Nutrition
Kitchen Gear and Equipment We Use and Love
I just wanted to let you know that some of the links on this page are affiliate links. This means that if you click on these links and make a purchase, I may earn a small commission at no extra cost to you. Rest assured, I only recommend products and services that I personally use and love. Your support through these links helps me continue to create valuable content and keep this blog running. I appreciate your support!

Amazon Basics Reusable Silicone Round Baking Cups, Muffin Liners, Pack of 12, Multicolor, 2.9 X 2.96 X 1.3 Inch
$6.99 (as of July 1, 2024 19:56 GMT -04:00 - More infoProduct prices and availability are accurate as of the date/time indicated and are subject to change. Any price and availability information displayed on [relevant Amazon Site(s), as applicable] at the time of purchase will apply to the purchase of this product.)
Reynolds Kitchens Parchment Paper Roll, 60 Square Feet
$5.01 (as of July 1, 2024 19:56 GMT -04:00 - More infoProduct prices and availability are accurate as of the date/time indicated and are subject to change. Any price and availability information displayed on [relevant Amazon Site(s), as applicable] at the time of purchase will apply to the purchase of this product.)
Star Cookie Cutter Set - Gtmkina 5 Pieces Mini Star Shaped Biscuit Cutter Set, Stainless Steel Small Cookie Cutters Set for DIY Holiday Party Decorations
$4.99 (as of July 1, 2024 19:56 GMT -04:00 - More infoProduct prices and availability are accurate as of the date/time indicated and are subject to change. Any price and availability information displayed on [relevant Amazon Site(s), as applicable] at the time of purchase will apply to the purchase of this product.)
Pavsrmy Baguette Bread Pan, Premium Nonstick Perforated Baguette Pan for French Bread Baking, 4 Loaves Baguette Baking Tray for Sourdough, Italian Bread, Perfect for Creating Crisp Golden-Brown Crust
$7.79 (as of July 2, 2024 20:16 GMT -04:00 - More infoProduct prices and availability are accurate as of the date/time indicated and are subject to change. Any price and availability information displayed on [relevant Amazon Site(s), as applicable] at the time of purchase will apply to the purchase of this product.)