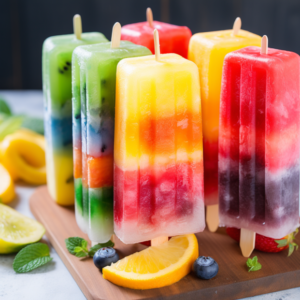
Rainbow Layered Fruit Popsicles: A Fun and Fruity Kitchen Adventure
Welcome to a vibrant voyage into the world of cooking with kids. Today’s destination is none other than the whimsical world of Rainbow-Layered Fruit Popsicles. This isn’t just any recipe; it’s a journey through colors, flavors, and teamwork, culminating in a frozen treat that’s as delightful to look at as it is to devour. So, grab your little helpers, and let’s set sail on this fruity adventure.
Table of Contents
The Concept: Frozen Rainbows in a Stick
Imagine holding a piece of rainbow, cold and sweet, melting into a cascade of flavors with every lick. That’s what Rainbow Layered Fruit Popsicles are all about. It’s more than a snack; it’s a hands-on experiment with nature’s colors and tastes, an edible art project that everyone in the family can contribute to and enjoy.
Preparing Your Palette
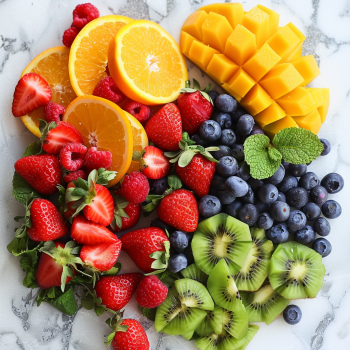
Our art supplies for this culinary canvas include a spectrum of fruits, each representing a different hue in the rainbow. Here’s what you’ll need:
- Red: Strawberries or raspberries
- Orange: Mangoes or peaches
- Yellow: Pineapples or golden kiwi
- Green: Kiwis or honeydew melon
- Blue: Blueberries
- Violet: Blackberries or purple grapes
For the popsicle base:
- Coconut water or your choice of fruit juice
And of course, the canvas:
- Popsicle molds and sticks
Setting the Stage for Rainbow Layered Fruit Popsicles
1. Fruitful Beginnings:
Start by washing all the fruits with the kids. They’ll love splashing in the water and you can teach them about the importance of cleaning their food. Then, move on to peeling and cutting the fruits into chunks. Depending on the age of your little chefs, they can help with peeling or using child-safe knives under supervision to chop the fruits.
2. Blending the Rainbow:
One color at a time, blend each fruit with a splash of coconut water or juice until smooth. This is a step where kids can push the button on the blender (with supervision) and watch as solid fruits transform into vibrant liquids.
3. Layering the Spectrum:
Here’s where the magic happens. Carefully pour the first layer of fruit puree into the popsicle molds. Let the kids help with this part, guiding them to pour slowly to create even layers. Freeze each layer for about 30 minutes before adding the next color. This step requires patience, but it’s a great opportunity to teach kids about waiting for good things to come.
4. Freezing Time:
Once all the layers are in and the final layer has set slightly in the freezer, it’s time to insert the sticks. Let your kids gently place the sticks into the semi-frozen popsicles. Then, freeze the entire mold until the popsicles are completely solid, usually about 4 hours or overnight.
5. The Big Reveal:
The most exciting part is unmolding the popsicles. Run warm water over the outside of the molds and gently pull the sticks. Watch your kids’ eyes light up as they see the rainbow they’ve created emerge.

Beyond the Recipe: A Learning Experience
This recipe is a fantastic way to introduce children to the concept of healthy eating, explaining how each colored fruit comes with its own set of vitamins and benefits. Discuss the science of freezing and how liquids solidify. It’s also an excellent opportunity to infuse lessons on colors, patience, and the joy of creating something from scratch.
The Sweet Reward of Teamwork
As you sit back and watch your little ones enjoy their rainbow creations, you’ll realize the true value of this activity. It’s not just about making popsicles; it’s about spending quality time together, learning, and making memories. These rainbow layered fruit popsicles represent a journey through teamwork, creativity, and the simple joys of childhood.
So, the next time you’re looking for a fun and engaging kitchen activity to share with your children, remember the rainbow layered fruit popsicles. Not only will they provide a refreshing treat on a hot day, but they’ll also offer a canvas for learning, laughter, and love. Here’s to creating more colorful culinary memories with your little ones, one layer at a time!
Rainbow Layered Fruit Popsicles
Equipment
Equipment and Ingredient sections may contain affiliate links to items we use and love.
Ingredients
- ½ cup This section may contain affiliate links to products we know and love.orange juice, freshly squeezed if possible
- ½ cup This section may contain affiliate links to products we know and love.strawberry puree, simply blend some fresh strawberries
- ½ cup This section may contain affiliate links to products we know and love.blueberry puree, blend fresh blueberries
- ½ cup This section may contain affiliate links to products we know and love.kiwi puree, blend fresh kiwis
- ½ cup This section may contain affiliate links to products we know and love.mango puree, blend ripe mangoes
- ½ cup This section may contain affiliate links to products we know and love.raspberry puree, blend fresh raspberries
- 6 This section may contain affiliate links to products we know and love.Popsicle Sticks
Instructions
- Begin by preparing all the fruit purees in separate bowls. If your purees are too thick, you can add a little water to get a pourable consistency.
- Start with the orange layer. Pour a small amount of orange juice into the bottom of each popsicle mold. Freeze for about 30 minutes, or until slightly set.
- Once the first layer is semi-frozen, gently pour the strawberry puree to form the next layer. Return to the freezer for another 30 minutes.
- Continue this process with the blueberry, kiwi, mango, and raspberry purees.
- After adding the raspberry layer, carefully insert a popsicle stick into each mold, making sure it’s centered.
- Let the popsicles freeze for at least 6 hours, or preferably overnight.
- Once fully set, run warm water over the molds for a few seconds to easily remove the popsicles.
- Serve immediately and watch the magic happen as kids (and adults!) enjoy the colorful layers.
Notes
Nutrition
Kitchen Gear and Equipment We Use and Love
I just wanted to let you know that some of the links on this page are affiliate links. This means that if you click on these links and make a purchase, I may earn a small commission at no extra cost to you. Rest assured, I only recommend products and services that I personally use and love. Your support through these links helps me continue to create valuable content and keep this blog running. I appreciate your support!

COMFEE' Portable Mini Dishwasher Countertop with 5L Built-in Water Tank for Apartments& RVs, No Hookup Needed, 6 Programs, 360° Dual Spray, 162℉ High-Temp& Air-Dry Function
$282.63 (as of July 4, 2024 20:46 GMT -04:00 - More infoProduct prices and availability are accurate as of the date/time indicated and are subject to change. Any price and availability information displayed on [relevant Amazon Site(s), as applicable] at the time of purchase will apply to the purchase of this product.)
Farberware Classic Wood Rolling Pin, 17.75-Inch, Natural
$12.99 (as of July 4, 2024 20:46 GMT -04:00 - More infoProduct prices and availability are accurate as of the date/time indicated and are subject to change. Any price and availability information displayed on [relevant Amazon Site(s), as applicable] at the time of purchase will apply to the purchase of this product.)
DOGHLY 4.5 Cu.ft Beverage Refrigerator Cooler, 145 Can Mini Fridge with Glass Door, Digital Temperature Display for Soda, Beer or Wine For Office or Bar with Adjustable Removable Shelves
$279.99 (as of July 3, 2024 20:42 GMT -04:00 - More infoProduct prices and availability are accurate as of the date/time indicated and are subject to change. Any price and availability information displayed on [relevant Amazon Site(s), as applicable] at the time of purchase will apply to the purchase of this product.)
Caperci Standard Natural Cupcake Liners 500 Count, No Smell, Food Grade & Grease-Proof Baking Cups Paper
$6.99 (as of July 4, 2024 20:46 GMT -04:00 - More infoProduct prices and availability are accurate as of the date/time indicated and are subject to change. Any price and availability information displayed on [relevant Amazon Site(s), as applicable] at the time of purchase will apply to the purchase of this product.)