Doughnut Delight: Crafting Kid-Tastic Mini Donuts Together
Hello, families! Get ready to sprinkle some joy, drizzle some fun, and dip into deliciousness as we embark on a whimsical kitchen adventure, creating Mini Donuts. Today’s recipe is not just about making mouthwatering treats; it’s about crafting memories, sharing laughter, and learning new skills. So, let’s put on our chef hats, invite our little helpers, and dive into the sweet world of mini donuts!
Table of Contents
Preparing Your Sweet Station
Start by transforming your kitchen into a mini donut factory. Clear off the counter space, gather your ingredients and tools, and assign safe spaces for each junior chef. Remember, safety first: hot surfaces, electrical appliances, and sharp objects are for adults to handle.
Ingredient Exploration: Sweet Sensations
Gather around, young chefs! Let’s explore our magical ingredients. Show the children the flour, sugar, baking powder, and other elements, explaining their purpose in our recipe. Let them feel the textures, smell the vanilla, and watch as dry turns into dough. This exploration is a fantastic way to spark their interest in baking and the science behind it.
Mixing Moments: The Dough Dance
This step is where our little ones can really shine. Under close supervision, let them help measure and pour the ingredients into the mixing bowl. Discuss measurements and follow directions as they whisk together the dry ingredients before an adult adds the wet ones. Watching their creation go from powdery to pasty, they learn about consistency and transformation, all while enjoying the ‘dough dance’ of mixing.
Shaping the Joy: Fun with Forms
Once your dough is ready, roll it out on a floured surface. Now, kids can use mini doughnut cutters (or safe alternatives) to cut out their doughnut shapes. This part is like playdough with a purpose! They can experiment with different shapes and sizes, enhancing their motor skills and creativity, all under the theme of delicious doughnut-making.
Baking Magic: The Transformation
While the actual baking should be done by adults, children can help set the timer and prepare for the transformation. Use this time to teach patience and anticipation. Watching through the oven glass, they can see their creations puff and solidify – a mini-lesson in heat’s effect on food.
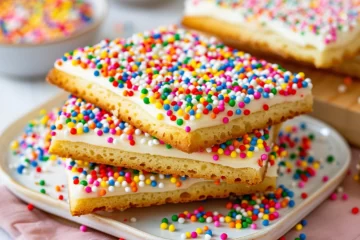
Decorating Station: Unleashing Creativity
Now, for the grand finale – decorating! Set up a ‘doughnut bar’ with different toppings: frosting, sprinkles, chocolate chips, and fruit slices. Each child can decorate their mini donuts, expressing their personalities through their designs. This part is not just fun; it’s a feast for imagination, color recognition, and fine motor skill development.
Storytime Snacks: Sharing Tales and Treats
As you enjoy the doughnuts, engage in storytime. Share tales related to cooking, or create whimsical stories about a doughnut kingdom. Integrating story with snack time enriches the experience, turning it into a moment of learning, imagination, and bonding.

Reflection and Responsibility: Cleanup with a Smile
After the feast, involve everyone in the cleanup. Assign simple tasks to the kids, turning the cleanup into a game or challenge. This teaches responsibility, teamwork, and appreciation for a clean space after cooking.
Donut Diaries: Documenting the Day
Encourage your children to draw or write about their mini donut adventure in a kitchen diary. They can describe what they did, what they learned, and how they felt. This not only helps in reinforcing their experience but also nurtures their writing and storytelling skills.
Sharing the Sweetness: Extend the Joy
Finally, if you have leftover mini donuts (a big if, considering how delicious they are!), package them up and deliver them to friends, family, or neighbors. Teach your kids the joy of sharing, kindness, and community connection through the simple act of giving.
Wrapping Up: Beyond the Mini Donuts
Our journey in making Kid-Tastic Mini Donuts goes far beyond the kitchen. It’s about sparking joy, fostering creativity, building skills, and making memories that last a lifetime. It’s a testament to the fact that cooking with kids can be an enriching experience that teaches them valuable life lessons while having fun.
So here’s to the messy counters, the sticky fingers, and the sweet smiles. May your mini donuts be as delightful as the time spent with your little ones. Keep baking, keep bonding, and most importantly, keep savoring these precious moments.
Until our next culinary adventure, happy baking, happy sharing, and happy tasting, one mini donut at a time!
Until our next sugary adventure, keep those ovens and your hearts warm. Happy baking, magical beings! 🌟🍩💖

Kid-tastic Mini Donuts
Equipment
Equipment and Ingredient sections may contain affiliate links to items we use and love.
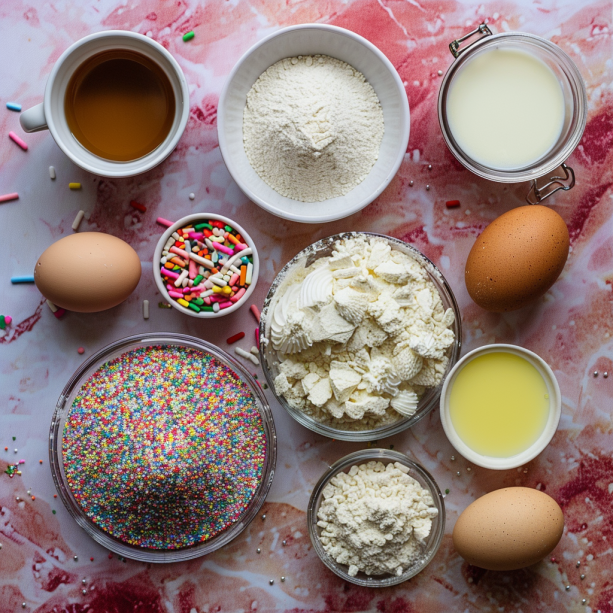
Ingredients
- 1 cup This section may contain affiliate links to products we know and love.All-Purpose Flour
- ½ cup This section may contain affiliate links to products we know and love.Granulated Sugar
- 1 tsp This section may contain affiliate links to products we know and love.Baking Powder
- ¼ tsp This section may contain affiliate links to products we know and love.Salt
- ½ cup This section may contain affiliate links to products we know and love.Milk, any variety works
- 1 This section may contain affiliate links to products we know and love.Eggs, lightly beaten
- 2 tbsp This section may contain affiliate links to products we know and love.Butter
- 1 tsp This section may contain affiliate links to products we know and love.Vanilla Extract
- Toppings: powdered sugar, chocolate glaze, rainbow sprinkles, or anything your heart desires!
Instructions
- Preheat and Prep: Start by preheating your oven to 375°F (190°C). Grease your mini donut pan well with some butter or non-stick spray.
- Mix Dry Ingredients: In a large bowl, whisk together flour, sugar, baking powder, and salt.
- Add the Wet Ones: In another bowl, combine milk, beaten egg, melted butter, and vanilla extract. Slowly pour this into the dry mixture, stirring until just combined.
- Fill ‘Em Up: Carefully spoon the batter into the donut cavities or use a piping bag for a neater approach.
- Bake and Wait: Pop them in the oven for 8-10 minutes or until they turn golden brown. Test with a toothpick – it should come out clean!
- Decorate & Delight: Once cooled, decorate with your choice of glaze, sprinkles, or a simple dusting of powdered sugar.
Notes
The best part of this recipe isn’t just the scrumptious donuts you’ll devour but the memories you’ll create with your young ones. Let their imagination take the wheel, and watch as your kitchen transforms into a wonderland of flavors and laughter. So, the next time you’re looking to create a sugary masterpiece, remember these kid-tastic mini donuts. Happy baking and even happier munching!
Nutrition
Kitchen Gear and Equipment We Use and Love
I just wanted to let you know that some of the links on this page are affiliate links. This means that if you click on these links and make a purchase, I may earn a small commission at no extra cost to you. Rest assured, I only recommend products and services that I personally use and love. Your support through these links helps me continue to create valuable content and keep this blog running. I appreciate your support!

Colour Mill Oil-Based Food Coloring, 20 Milliliters Sage
$10.95 (as of July 1, 2024 19:56 GMT -04:00 - More infoProduct prices and availability are accurate as of the date/time indicated and are subject to change. Any price and availability information displayed on [relevant Amazon Site(s), as applicable] at the time of purchase will apply to the purchase of this product.)
Caraway Nonstick Ceramic Bakeware Set (11 Pieces) - Baking Sheets, Assorted Baking Pans, Cooling Rack, & Storage - Aluminized Steel Body - Non Toxic, PTFE & PFOA Free - Black
$595.00 (as of July 1, 2024 19:56 GMT -04:00 - More infoProduct prices and availability are accurate as of the date/time indicated and are subject to change. Any price and availability information displayed on [relevant Amazon Site(s), as applicable] at the time of purchase will apply to the purchase of this product.)
Cooking Utensils Set- 35 PCs Kitchen Utensils with Grater,Tongs, Spoon Spatula &Turner Made of Heat Resistant Food Grade Silicone and Wooden Handles Kitchen Gadgets Tools Set for Nonstick Cookware
$42.99 (as of July 1, 2024 19:56 GMT -04:00 - More infoProduct prices and availability are accurate as of the date/time indicated and are subject to change. Any price and availability information displayed on [relevant Amazon Site(s), as applicable] at the time of purchase will apply to the purchase of this product.)
225PCS Air Fryer Disposable Paper Liners for Ninja Dual Airfryer, Rectangular 8.6x5.5 inch Parchment Paper Liners for DZ201, DZ401, Oil Proof, Water Proof Baking Paper
$14.99 (as of July 1, 2024 19:56 GMT -04:00 - More infoProduct prices and availability are accurate as of the date/time indicated and are subject to change. Any price and availability information displayed on [relevant Amazon Site(s), as applicable] at the time of purchase will apply to the purchase of this product.)