Crunchy Dill Pickle Chicken Tenders: A Tangy Twist on a Classic
Introduction
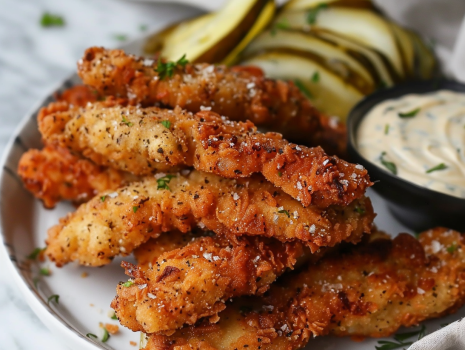
Looking for a unique and delicious twist on classic chicken tenders? These Crunchy Dill Pickle Chicken Tenders are the perfect solution. Marinated in dill pickle juice and coated with a crispy breadcrumb layer, these tenders are bursting with flavor and crunch. Whether you’re planning a family dinner, a game day snack, or a fun weekend meal, this recipe is sure to become a favorite. Let’s dive into the details of how to make this tasty dish!
Table of Contents
Why You’ll Love This Recipe
- Flavorful and Tangy: The dill pickle marinade adds a delightful tanginess that sets these tenders apart.
- Crispy Texture: The breadcrumb coating ensures a satisfying crunch in every bite.
- Kid-Friendly: Kids will love helping with the preparation and, of course, eating the delicious results.
- Versatile: Perfect for dinners, snacks, or even as party appetizers.
Ingredients Needed
Here’s everything you need to make these mouthwatering Crunchy Dill Pickle Chicken Tenders:
- 1 lb chicken tenders
- 1 cup dill pickle juice (from a jar of dill pickles)
- 1 cup all-purpose flour
- 1 teaspoon garlic powder
- 1 teaspoon onion powder
- 1 teaspoon paprika
- Salt and pepper to taste
- 2 large eggs
- 2 cups breadcrumbs (panko or regular)
- Cooking spray or oil for baking

How Kids Can Help
Cooking with kids can be a fun and educational experience. Here’s how your little chefs can assist with this recipe:
- Measuring Ingredients: Kids can help measure out the pickle juice, flour, and breadcrumbs.
- Mixing: Let them whisk the eggs and mix the breadcrumb coating.
- Dredging: Older kids can help dredge the chicken tenders through the flour, egg, and breadcrumb mixtures.
- Arranging on the Baking Sheet: Kids can place the coated chicken tenders on the baking sheet.
Step-by-Step Instructions
1. Marinate the Chicken
- Marinate: Place the chicken tenders in a resealable plastic bag or shallow dish. Pour the dill pickle juice over the chicken, ensuring all pieces are covered. Seal the bag or cover the dish and refrigerate for at least 1 hour.
2. Prepare the Coating
- Preheat Oven: Preheat your oven to 400°F (200°C). Line a baking sheet with parchment paper or place a wire rack on the baking sheet and spray with cooking spray.
- Flour Mixture: In a shallow bowl or plate, combine the flour, garlic powder, onion powder, paprika, salt, and pepper.
- Egg Wash: In another shallow bowl, whisk the eggs.
- Breadcrumbs: In a third shallow bowl, place the breadcrumbs.

3. Coat the Chicken
- Dredge: Remove the chicken tenders from the marinade, shaking off any excess liquid. Dredge each tender in the flour mixture, dip in the egg wash, and coat with breadcrumbs, pressing gently to adhere.
4. Bake the Chicken
- Arrange on Baking Sheet: Place the coated chicken tenders on the prepared baking sheet. Lightly spray the tops with cooking spray to help them brown.
- Bake: Bake in the preheated oven for 20 minutes, flipping halfway through, until the chicken is cooked through and the coating is golden and crispy.
5. Serve
- Enjoy: Serve the chicken tenders hot with your favorite dipping sauces and a side of dill pickles if desired.
How to Store Leftovers
- Refrigeration: Store leftover chicken tenders in an airtight container in the refrigerator for up to 3 days.
- Reheating: Reheat in the oven at 350°F (175°C) for about 10 minutes or until heated through. This helps maintain the crispy texture.
- Freezing: These tenders can also be frozen. Place them in a single layer on a baking sheet to freeze, then transfer to a resealable plastic bag. Reheat in the oven directly from frozen.
Substitutions and Additions
This recipe is highly adaptable and can be customized to suit your preferences:
- Air Fryer Option: Cook the tenders in an air fryer at 400°F (200°C) for 10-12 minutes, flipping halfway through.
- Gluten-Free Option: Use gluten-free breadcrumbs and flour to make this dish suitable for those with gluten sensitivities.
- Extra Crunch: Add crushed cornflakes or crushed potato chips to the breadcrumb mixture for an extra crispy coating.
- Spicy Variation: Add a teaspoon of cayenne pepper or hot sauce to the marinade for a spicy kick.
Frequently Asked Questions
Q: Can I use chicken breasts instead of tenders? A: Yes, you can cut chicken breasts into strips if you don’t have tenders on hand.
Q: How long should I marinate the chicken? A: Marinate for at least 1 hour, but for best results, marinate overnight.
Q: What dipping sauces go well with these tenders? A: Ranch, honey mustard, BBQ sauce, and even more dill pickle juice make great dipping options.
Reasons to Love Crunchy Dill Pickle Chicken Tenders
- Unique Flavor: The dill pickle marinade adds a unique and delicious tanginess.
- Crunchy Texture: The breadcrumb coating provides the perfect crunch.
- Easy to Make: Simple ingredients and straightforward steps make this recipe accessible to everyone.
- Family-Friendly: Kids love the fun flavor and crispy texture, making this a great meal for families.
Conclusion
Crunchy Dill Pickle Chicken Tenders are a delightful twist on classic chicken tenders. The tangy dill pickle marinade and crispy breadcrumb coating make these tenders a standout dish that’s perfect for any occasion. Easy to make and flavorful, this recipe will surely become a family favorite. Try it out today and enjoy the delicious combination of tangy and crispy in every bite!

Crunchy Dill Pickle Chicken Tenders
Equipment
Equipment and Ingredient sections may contain affiliate links to items we use and love.
Ingredients
- 1 lb This section may contain affiliate links to products we know and love.Chicken Breast
- 1 cup This section may contain affiliate links to products we know and love.Dill Pickles, from a jar of dill pickles
- 1 cup This section may contain affiliate links to products we know and love.All-Purpose Flour
- 1 teaspoon This section may contain affiliate links to products we know and love.Garlic Powder
- 1 teaspoon This section may contain affiliate links to products we know and love.Onion Powder
- 1 teaspoon This section may contain affiliate links to products we know and love.Paprika
- This section may contain affiliate links to products we know and love.Salt and Pepper
- 2 This section may contain affiliate links to products we know and love.Eggs
- 2 cups This section may contain affiliate links to products we know and love.Breadcrumbs, panko or regular
- This section may contain affiliate links to products we know and love.Cooking Spray
Instructions
Marinate the Chicken
- Marinate: Place the chicken tenders in a resealable plastic bag or shallow dish. Pour the dill pickle juice over the chicken, ensuring all pieces are covered. Seal the bag or cover the dish and refrigerate for at least 1 hour.
Prepare the Coating
- Preheat Oven: Preheat your oven to 400°F (200°C). Line a baking sheet with parchment paper or place a wire rack on the baking sheet and spray with cooking spray.
- Flour Mixture: In a shallow bowl or plate, combine the flour, garlic powder, onion powder, paprika, salt, and pepper.
- Egg Wash: In another shallow bowl, whisk the eggs.
- Breadcrumbs: In a third shallow bowl, place the breadcrumbs.
Coat the Chicken
- Dredge: Remove the chicken tenders from the marinade, shaking off any excess liquid. Dredge each tender in the flour mixture, then dip in the egg wash, and finally coat with breadcrumbs, pressing gently to adhere.
Bake the Chicken
- Arrange on Baking Sheet: Place the coated chicken tenders on the prepared baking sheet. Lightly spray the tops with cooking spray to help them brown.
- Bake: Bake in the preheated oven for 20 minutes, flipping halfway through, until the chicken is cooked through and the coating is golden and crispy.
Serve
Notes
Make Ahead: Marinate the chicken the night before for extra flavor.
Storage: Store leftovers in an airtight container in the refrigerator for up to 3 days. Reheat in the oven or air fryer to maintain crispiness.
Gluten-Free Option: Use gluten-free breadcrumbs and flour for a gluten-free version of this recipe.
Nutrition
Kitchen Gear and Equipment We Use and Love
I just wanted to let you know that some of the links on this page are affiliate links. This means that if you click on these links and make a purchase, I may earn a small commission at no extra cost to you. Rest assured, I only recommend products and services that I personally use and love. Your support through these links helps me continue to create valuable content and keep this blog running. I appreciate your support!

Greater Goods Digital Kitchen Scale - Cooking, Baking, Meal and Food Prep Scale, Weighs in Grams, Pounds and Ounces, Gray
$9.99 (as of July 3, 2024 20:42 GMT -04:00 - More infoProduct prices and availability are accurate as of the date/time indicated and are subject to change. Any price and availability information displayed on [relevant Amazon Site(s), as applicable] at the time of purchase will apply to the purchase of this product.)
Air Fryer Paper Liners, 120Pcs Air Fryer Disposable Liners, Non-Stick and Oil Proof for Easy Cleanup, 8” Square for 5-8 qt Basket by Baker's Signature
$11.99 (as of July 1, 2024 19:56 GMT -04:00 - More infoProduct prices and availability are accurate as of the date/time indicated and are subject to change. Any price and availability information displayed on [relevant Amazon Site(s), as applicable] at the time of purchase will apply to the purchase of this product.)
Portable Washing Machine, 11L Large Capacity Mini Washing Machine, Foldable Collapsible Washer and Dryer with Spin for Travel, Socks, Baby Clothes
$59.99 (as of July 3, 2024 20:42 GMT -04:00 - More infoProduct prices and availability are accurate as of the date/time indicated and are subject to change. Any price and availability information displayed on [relevant Amazon Site(s), as applicable] at the time of purchase will apply to the purchase of this product.)
Ice Makers Countertop, Self-Cleaning Function, Portable Electric Ice Cube Maker Machine, 9 Pellet Ice Ready in 6 Mins, 26lbs 24Hrs with Ice Bags and Scoop Basket for Home Bar Camping RV(Black)
$84.99 (as of July 3, 2024 20:42 GMT -04:00 - More infoProduct prices and availability are accurate as of the date/time indicated and are subject to change. Any price and availability information displayed on [relevant Amazon Site(s), as applicable] at the time of purchase will apply to the purchase of this product.)