Mini Pita Pizzas: A Family Cooking Night Full of Fun and Learning
Welcome, families! Today, we’re turning the ordinary into the extraordinary with a recipe that’s sure to become a family favorite: Mini Pita Pizzas. This isn’t just about making dinner; it’s about creating memories, learning new skills, and having a blast with your little chefs. So, roll up those sleeves, gather around the kitchen, and let’s embark on a culinary adventure that’s as enjoyable as it is educational.
Table of Contents
Setting the Stage for Mini Pita Pizzas Culinary Fun
First things first, let’s create the right atmosphere. Cooking with kids should be fun, so maybe put on some Italian music to set the scene, wear aprons to feel like professional chefs, and get ready to make some delicious mini masterpieces. This is a great opportunity to talk to your kids about Italy, where pizza originated, and the importance of trying foods from different cultures.
Gathering Ingredients: A Lesson in Organizing
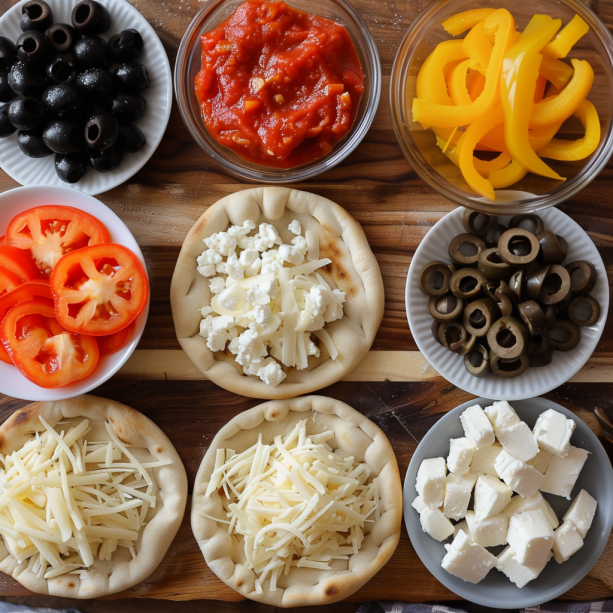
Begin your cooking adventure by gathering all your ingredients. You’ll need mini pitas, tomato sauce, cheese, and a variety of toppings like pepperoni, mushrooms, peppers, and anything else your family loves. As you collect these, involve your kids by asking them to name the colors, count the items, or guess what each ingredient might taste like. This makes them feel involved and turns shopping into a fun learning experience.
Preparing the Pitas: Everyone Gets a Turn
The beauty of mini pita pizzas is that everyone can create their own. Lay out the mini pitas on a baking sheet and have your little ones spread tomato sauce on each one. This is a perfect time to practice spreading skills and discuss why the sauce is essential to pizza. Encourage them to leave a little border around the edge – just like a real pizza!
Topping Time: A Lesson in Choices and Creativity
Now comes the most creative part: adding the toppings. Set out bowls of cheese, sliced pepperoni, chopped vegetables, and anything else you’re using. Let each child choose their toppings, encouraging them to create faces, patterns, or just a colorful mix. Talk about the flavors and textures of each ingredient. This step isn’t just fun; it’s a way to encourage independence and decision-making.
Cheese, Please: A Melty Moment
After the toppings, it’s time for cheese—a critical component of any pizza. Teach your kids about the different types of cheese and why some melt better than others. Let them sprinkle cheese on their pizzas and discuss how heat transforms it from a solid to a melty delight. This is a great mini-science lesson on states of matter.
Baking Time: Patience and Safety
While the mini pita pizzas bake (with adult supervision), discuss kitchen safety and the importance of patience. Use this waiting time to clean up together, which is a great habit for kids to learn early on. You can also use this time to talk about how cooking can be a way to show care for others – making something delicious to share with family is a form of love and kindness.
Taste Test: The Reward of Hard Work
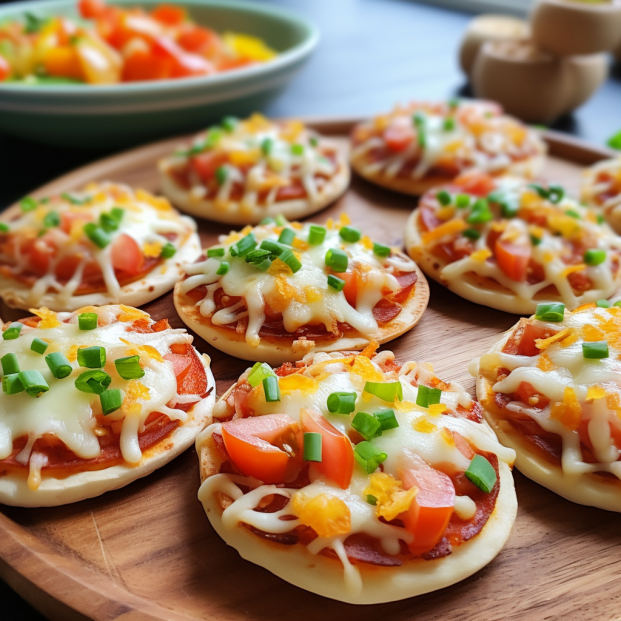
Once the pizzas are done, it’s time for the best part: eating! Have a family taste test and let everyone describe what they like about their pizzas. This encourages kids to express their thoughts and tastes, and they’ll be extra proud knowing they made it themselves. Plus, it’s a great way to wind down and enjoy the fruits of your labor together.
Reflection Time: From Kitchen to Classroom
After your meal, reflect on what everyone learned and enjoyed. What was your favorite topping? What would they do differently next time? This reflection helps children understand that cooking, like learning, is a process, and it’s okay to make mistakes and try again.
Sharing the Joy: Extend the Learning Beyond Your Kitchen
Encourage your kids to share their cooking experience with friends, maybe by inviting them over for a mini pita pizza party next time. They can also write about their cooking adventure or draw pictures of their pizzas, reinforcing their learning and sharing their pride in their creations.
Documenting the Memory: A Recipe for the Future
Lastly, take photos and maybe even create a family cookbook, including the mini pita pizza recipe and the memories you made. This preserves a lovely family moment and encourages reading and writing skills as they help compile the book.
Turning mini pita pizzas into a family project teaches your kids more than just how to cook. You’re teaching them about planning, teamwork, nutrition, and culture. You’re giving them a sense of accomplishment and the joy of sharing. And most importantly, you’re making fun, delicious memories that they—and you—will cherish long after the last bite is gone. So, cheers to family cooking nights, where every ingredient is a learning opportunity, and every meal is a celebration.

Mini Pita Pizzas
Equipment
Equipment and Ingredient sections may contain affiliate links to items we use and love.
Ingredients
- 8 mini pita breads
- 1 cup pizza sauce, store-bought or homemade
- 1 cup This section may contain affiliate links to products we know and love.Shredded Cheese
- 1/2 cup This section may contain affiliate links to products we know and love.Bell Pepper, diced
- 1/4 cup olives, sliced
- 1/4 cup This section may contain affiliate links to products we know and love.Cherry Tomatoes, halved
- 1/4 cup fresh basil leaves, optional
- This section may contain affiliate links to products we know and love.Olive Oil, for brushing
- Salt and oregano to taste
Instructions
- Preheat and Prep: Preheat the oven to 400°F (200°C). Arrange mini pita breads on a baking sheet.
- Saucy Base: Allow your child to spoon a dollop of pizza sauce onto each pita, spreading it out but leaving a small border around the edges.
- Cheese Galore: Sprinkle a generous amount of mozzarella cheese over the sauce on each pita.
- Veggie Delight: Let the little chefs decorate their pita pizzas with diced bell peppers, olives, and cherry tomatoes. A sprinkle of salt and oregano on top will enhance the flavor!
- Bake: Place the baking sheet in the preheated oven and bake for 8-10 minutes, or until the cheese is melted and bubbly and the edges of the pitas are golden brown.
- Garnish and Serve: Once out of the oven, let them cool slightly, then garnish with fresh basil leaves if desired. Pack them in the lunchbox or enjoy them right away!
Notes
Nutrition
Kitchen Gear and Equipment We Use and Love
I just wanted to let you know that some of the links on this page are affiliate links. This means that if you click on these links and make a purchase, I may earn a small commission at no extra cost to you. Rest assured, I only recommend products and services that I personally use and love. Your support through these links helps me continue to create valuable content and keep this blog running. I appreciate your support!

Portable Washing Machine, Portable Washing Machine for Sink, Mini Washing Machine, Turbine Washing Machine with USB, Suitable for Home, Business, Travel, College Room, RV, Apartment (White)
$24.98 (as of July 3, 2024 20:42 GMT -04:00 - More infoProduct prices and availability are accurate as of the date/time indicated and are subject to change. Any price and availability information displayed on [relevant Amazon Site(s), as applicable] at the time of purchase will apply to the purchase of this product.)
Doghly Compact Mini Twin Tub Washing Machine with Drying Rack, 11lbs Portable Laundry Washer and 7lbs Spinner, Convenient and Efficient for Dorms, Apartment (18lbs)
$109.99 (as of July 3, 2024 20:42 GMT -04:00 - More infoProduct prices and availability are accurate as of the date/time indicated and are subject to change. Any price and availability information displayed on [relevant Amazon Site(s), as applicable] at the time of purchase will apply to the purchase of this product.)
PIJOOKI 30pcs Trol Party Favors Bags Trol-themed Party Decorations Supplies Trol-themed Birthday Party Candy Bag Trol Goodie Bags.
$9.99 (as of July 4, 2024 20:46 GMT -04:00 - More infoProduct prices and availability are accurate as of the date/time indicated and are subject to change. Any price and availability information displayed on [relevant Amazon Site(s), as applicable] at the time of purchase will apply to the purchase of this product.)
Food Coloring Set - 12 Color Food Grade Vibrant Food Dye Tasteless Liquid Color for Cake Decorating, Baking, Easter Egg, Icing, Fondant, Cooking, Slime Making DIY Supplies Kit - 0.35 Fl. oz (10 ml)/Bottles
$11.98 (as of July 4, 2024 20:46 GMT -04:00 - More infoProduct prices and availability are accurate as of the date/time indicated and are subject to change. Any price and availability information displayed on [relevant Amazon Site(s), as applicable] at the time of purchase will apply to the purchase of this product.)