The Ultimate Family Baking Adventure: Making Banana Bread
Hello, dear readers! Today, I’m thrilled to walk you through a heartwarming journey that’s not only about baking but also about creating memories—making the ultimate banana bread with a twist of family fun and learning. So, preheat your ovens, tie those apron strings, and let’s dive into a baking experience that the whole family, especially the little ones, will adore.
Table of Contents
The Magic of Banana Bread
Banana bread, a timeless classic, holds a special place in our hearts and kitchens. It’s the perfect solution to overripe bananas and an even better way to bring the family together. This moist, sweet, and comforting bread is not just a treat; it’s a vessel for lessons in baking, bonding, and the beauty of transforming simple ingredients into something magical.
Pre-Bake Bonding: A Family Gathering
Before we start, gather everyone in the kitchen for a little pre-baking meeting. This is a great time to talk about the steps you’ll be taking and assign age-appropriate tasks to each family member. It’s not just about delegating duties; it’s about making everyone feel involved and important in the process.
The Ingredients: A Treasure Hunt
Transform ingredient gathering into a treasure hunt. Have the kids help with finding and measuring the ingredients. This is a fantastic opportunity to teach measurements, fractions, and following instructions. Plus, it’s a lot of fun to see their faces light up when they find the right ingredients, like little kitchen detectives.
Mashing Madness: Where Kids Shine
Now, for the most kid-friendly part: mashing the bananas. Kids absolutely love this part! Give each child a fork and let them go to town on those bananas. It’s not only great for developing motor skills but also a safe way for them to be directly involved in the recipe. While they’re at it, it’s the perfect time to discuss why we use ripe bananas (they’re sweeter and mash easier!) and how nothing goes to waste in the kitchen.
Mixing Moments: A Stirring Experience
Once the bananas are mashed, it’s time to mix in the other ingredients. Depending on the ages of your little helpers, they can take turns adding and stirring the ingredients. Explain the role of each component as you go along—eggs for binding, flour for structure, and sugar for sweetness. This step is not just about mixing; it’s about understanding the science behind baking.
Pour and Decorate: Creativity Unleashed
After the batter is ready, kids can help pour it into the loaf pan. Then, let their creativity shine by decorating the top with extra banana slices, nuts, or chocolate chips. This step is great for teaching them about presentation and how the appearance of food enhances its appeal.
The Waiting Game: Patience and Aromas
As the banana bread bakes, use this time to teach patience—an essential baking virtue. Discuss how the heat transforms the batter into bread, causing it to rise and brown. The delicious aroma filling the air makes this waiting game a bit easier and a lot more exciting.
Safety First: The Adult’s Role
When it comes to taking the bread out of the oven, this is where adults step in. It’s important to demonstrate and discuss kitchen safety, especially when dealing with hot appliances. Kids can watch from a safe distance, learning that safety is always a priority.
The Final Touch: A Lesson in Patience and Rewards
Once the banana bread is safely out and cooling, it’s a good time to have a chat about patience and how some things, like good food, are worth waiting for. Discuss the transformation the bread has undergone and recap the steps you took to get there.
The Best Part: Slice and Savor
Now, the moment everyone’s been waiting for—slicing and tasting the banana bread. Serve up slices for everyone and sit down to enjoy the fruits of your labor together. This is a perfect time to reflect on the experience and ask the kids what they learned and what they enjoyed the most.

Beyond the Bread: Educational Extras
To extend the learning experience, you can discuss where ingredients come from, such as how bananas grow or the process of making flour. This can lead to discussions about healthy eating, food sources, and even geography.
Cherishing Memories and Leftovers
As you enjoy the banana bread, talk about the memories you’ve made. Take photos, make a little scrapbook page, or write down the recipe with notes on who did what. This not only commemorates the experience but also encourages a tradition of family baking days.
Sharing the Love: Spreading Joy Beyond the Family
Encourage the kids to think about who else might enjoy the banana bread. Perhaps there’s a neighbor, friend, or family member who would appreciate a slice. This teaches them the joy of sharing and the value of community.
Wrapping Up: The Sweet Conclusion
Making banana bread with your family is about so much more than just baking; it’s about teaching, learning, bonding, and of course, enjoying delicious food together. Each step offers valuable lessons and joyful moments that turn a simple baking day into a cherished family memory.
So there you have it, friends, a guide to making not just banana bread but memories that are as sweet and warm as the bread itself. May your kitchen be filled with laughter, love, and the wonderful aroma of baking. Here’s to many more delightful and educational culinary adventures with your loved ones. Happy baking!
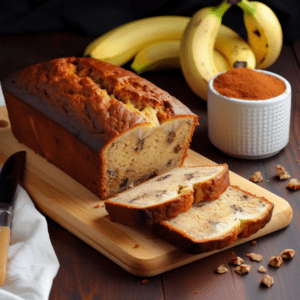
Banana Bread
Equipment
Equipment and Ingredient sections may contain affiliate links to items we use and love.
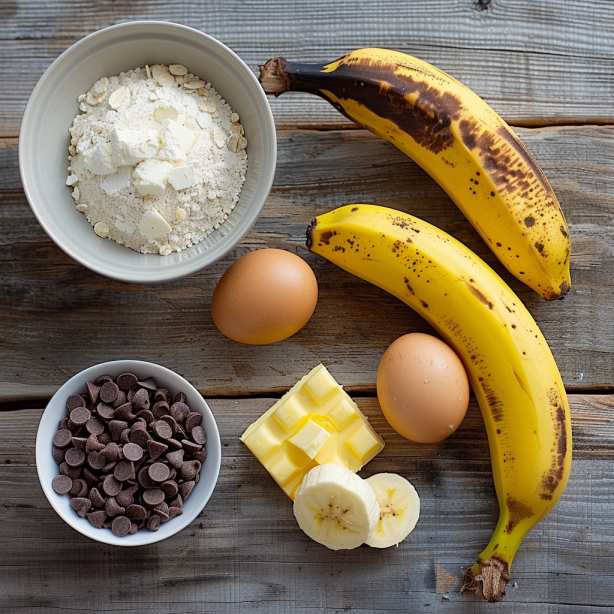
Ingredients
- 3 This section may contain affiliate links to products we know and love.bananas, mashed
- 1¾ cups This section may contain affiliate links to products we know and love.All-Purpose Flour
- 1 teaspoon This section may contain affiliate links to products we know and love.Baking Powder
- 1/2 teaspoon This section may contain affiliate links to products we know and love.Baking Soda
- 1/4 teaspoon This section may contain affiliate links to products we know and love.Salt
- 1/2 cup This section may contain affiliate links to products we know and love.Butter, melted
- 3/4 cup This section may contain affiliate links to products we know and love.Sugar
- 2 This section may contain affiliate links to products we know and love.Eggs
- 1 teaspoon This section may contain affiliate links to products we know and love.Vanilla Extract
- Optional: 1/2 cup chopped nuts or chocolate chips
Instructions
- Start by preheating the oven to 350°F (175°C). With the help of an adult, grease the loaf pan or line it with parchment paper.
- In one mixing bowl, whisk together the flour, baking powder, baking soda, and salt. This is our dry mixture.
- In another bowl, mix the melted butter and sugar together until smooth. Add the eggs one at a time, followed by the vanilla extract, mixing well after each addition.
- Slowly add the dry mixture to the wet mixture, stirring until just combined.
- Fold in the mashed bananas. If you’re using nuts or chocolate chips, add them in now.
- Pour the batter into the prepared loaf pan, spreading it out evenly.
- Place in the oven and bake for 55-60 minutes, or until a toothpick inserted into the center comes out clean.
- Once done, remove from the oven and let it cool in the pan for about 10 minutes. Then, transfer to a wire rack to cool completely.
- Slice, serve, and enjoy the fruits of your labor!
Notes
Nutrition
Kitchen Gear and Equipment We Use and Love
I just wanted to let you know that some of the links on this page are affiliate links. This means that if you click on these links and make a purchase, I may earn a small commission at no extra cost to you. Rest assured, I only recommend products and services that I personally use and love. Your support through these links helps me continue to create valuable content and keep this blog running. I appreciate your support!

Cherry Pitter, Multiple Cherries Seed Remover, Labor-Saving Push Down Cherry Corer Pitting Tool
$15.49 (as of July 2, 2024 20:16 GMT -04:00 - More infoProduct prices and availability are accurate as of the date/time indicated and are subject to change. Any price and availability information displayed on [relevant Amazon Site(s), as applicable] at the time of purchase will apply to the purchase of this product.)
SMARTAKE 200 Pcs Parchment Paper Baking Sheets, 12x16 Inches Non-Stick Precut Baking Parchment, Perfect for Baking Grilling Air Fryer Steaming Bread Cup Cake Cookie and More (Unbleached)
$16.99 (as of July 4, 2024 20:46 GMT -04:00 - More infoProduct prices and availability are accurate as of the date/time indicated and are subject to change. Any price and availability information displayed on [relevant Amazon Site(s), as applicable] at the time of purchase will apply to the purchase of this product.)
CAKETIME Mini Muffin Pan, Metal Reinforced Frame Mini Cupcake Pans 24 Cups Nonstick Mini Muffin Silicone Molds with Handle for Baking Mini Muffins, Mini Cupcakes, Mini Egg Bites 2 Pack
$19.99 (as of July 4, 2024 20:46 GMT -04:00 - More infoProduct prices and availability are accurate as of the date/time indicated and are subject to change. Any price and availability information displayed on [relevant Amazon Site(s), as applicable] at the time of purchase will apply to the purchase of this product.)
Velaco 2 PACK 2-in-1 Watermelon Cutter and Fork, 9.5 Inch Stainless Steel Fruit Cutter Slicer Tool
$7.99 (as of July 2, 2024 20:16 GMT -04:00 - More infoProduct prices and availability are accurate as of the date/time indicated and are subject to change. Any price and availability information displayed on [relevant Amazon Site(s), as applicable] at the time of purchase will apply to the purchase of this product.)